Goal : for each Nego, some settings can be defined to improve your Negotiation. Main part of them is defined specifically per Nego but some others can be set up for all Negos. Settings can be for example currency rate, reference prices description, savings calculation, etc.
En complément de la liste précedente, le lancement de vos négociations périodiques nécessite de définir votre stratégie de négociations et les paramètres qui en découlent : Quelles familles et quel périmètre négocier, devez-vous consolider les articles, etc. Voici la liste des questions à se poser avant d’engager vos Négos, et le lien vers la documentation si nécessaire. Télécharger la check list Strategy & Settings
Specific information about each Negotiation
Within a Negotiation, 3 tabs are available on the top left to enable you to manage global negotiation settings and information: General Info, Memo and Documents.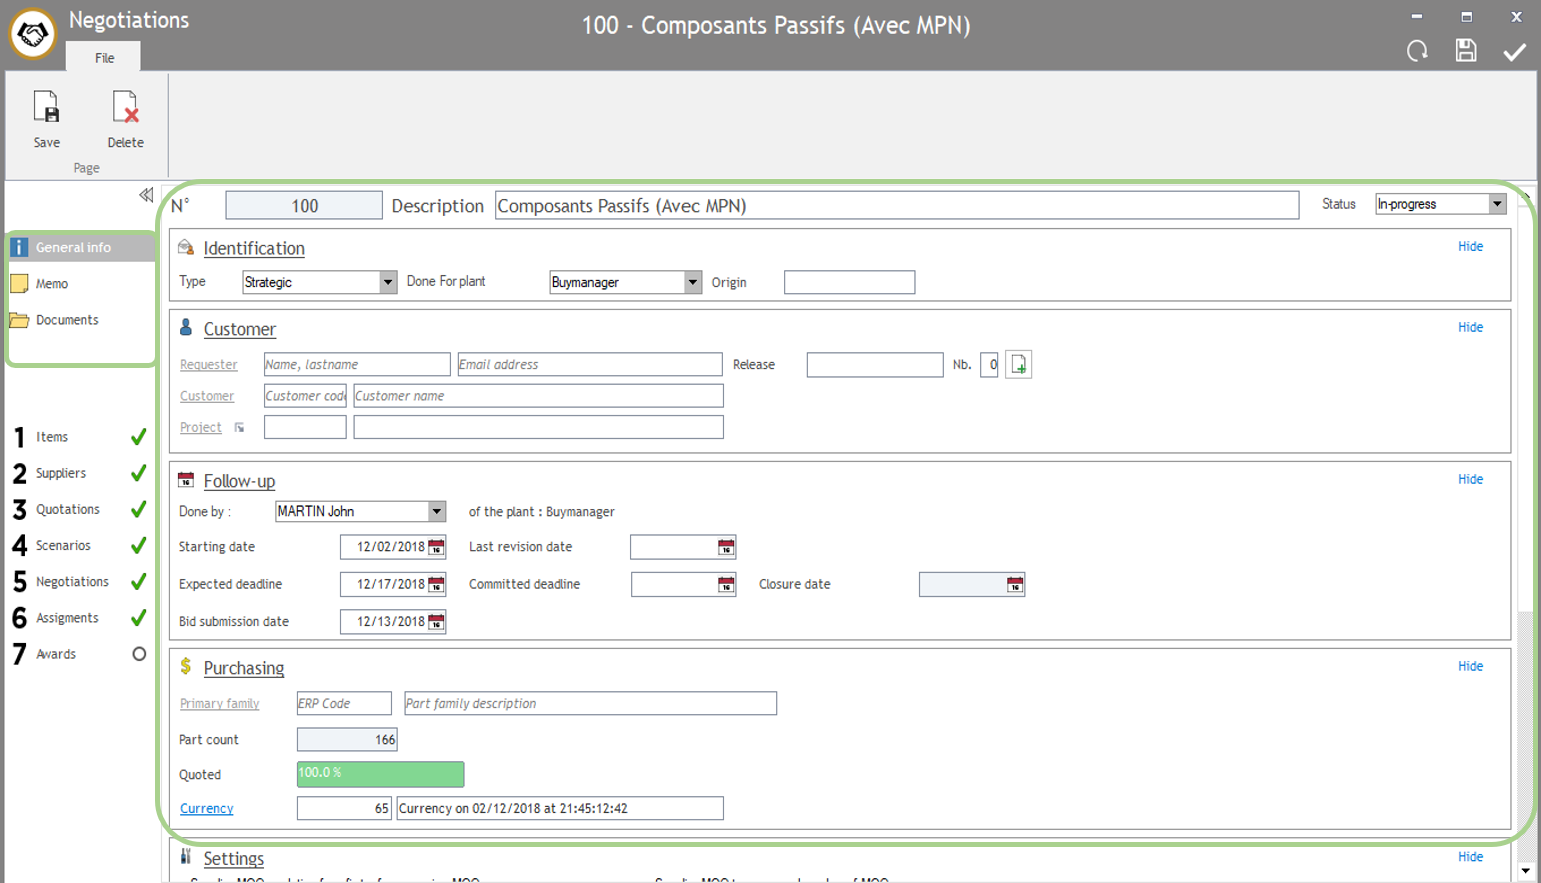
1. Information available in General Info
All information available in this section can be changed if needed.
This information is defined specifically for each Nego.
You’ll mainly find :
- Information defined at the creation stage : description, type, plant, dates, user, etc. For more information, please see Step 0.
-
Customer’s information :

- Requester : The person in your company who demands to manage this Negotiation. Usually, it’s the manager or the commercial. You can enter his name or his email address. If this person is not recorded
already in BM, you can create her by clicking on “New”.
- Requester : The person in your company who demands to manage this Negotiation. Usually, it’s the manager or the commercial. You can enter his name or his email address. If this person is not recorded
-
- Customer : if negotiation is done for a specific customer, please enter his code or his name in this field.
-
Project : negotiation can be linked to a project that you can create in the Project section in Buymanager Home if you have the licence.
- Example : Project will be “2020 Negotiations”, then you will create different negotiations : “Active”, “Passive”, “Electrotech”…
-
More dates :
- 3 already available at the creation stage : “starting date”, “expected deadline” and “bid submission date”
- Last revision date : date on which you received the last version of your forecast (in case there are modifications) (modifications need to be done before to send RFQs).
-
Committed deadline : you think you will finish the Negotiation on this date. The difference with the “expected deadline” is that this one is requested by the requester, although the committed deadline is yours. For example, your requester asks you to finish the Nego for the 15th July but you know it will be finished for the 30th July, so :
- Expected deadline : 15th July
- Committed deadline : 30th July
- Closure date : this date is filled automatically when you close the Negotiation.
- Purchasing information :

-
- Family : if your negotiation is done for a specific family, please enter its code or its name in this field.
- Part count : number of parts uploaded in your negotiation.
Note : if you consolidated parts, you’ll see here the number of consolidated parts and not the number of original parts.
-
- Quoted : percentage of quoted part in your negotiation (number of parts with at least 1 price received from suppliers / total number of parts).
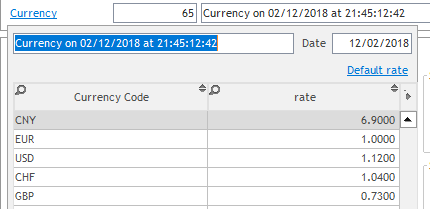
- Currency : click on “currency” to see currencies as defined at the creation stage (see Step 0). If needed, you can change currency rate which will update the whole negotiation. Please see FAQ – 2. for more information.
2. Other information (Memo, documents)
In these sections, you can add some comments (for internal use or for your suppliers) and manage your documents.
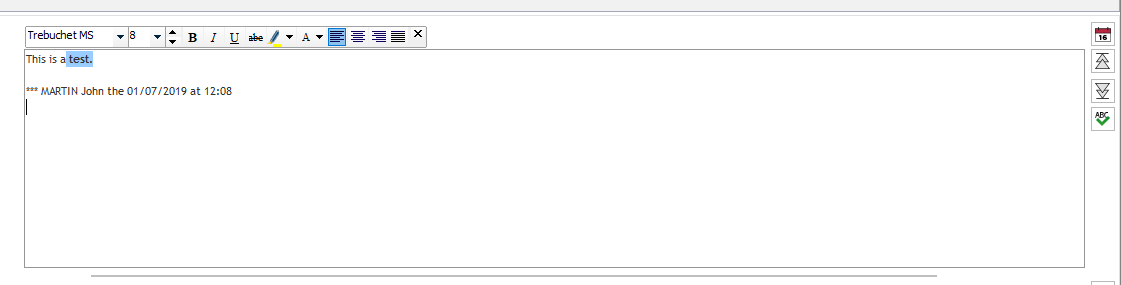
- Memo section
In this section, 2 fields are available to write some comments :
- The first one, on the top, is to suppliers’ use : the comments you will write in this fields will be displayed to the supplier in the RFQ Excel file.
Note : you need to set-up your Excel file to show this field, it’s not automatic. Please see with your administrator.
- The second one, in the bottom, in for internal use only : you can see it in the Negotiation in Buymanager and export it in the “report to plant” if you wish.
Note : you need to set-up your Excel file “report to plant” to show this field, it’s not automatic. Please see with your administrator.

When you write in these fields, you can customize your text such as in a Word : bold, italic, size, colors, etc.
You can also add a “comment information” by clicking on the calendar icon on the right to display the writer’s name, the date and the time.
- Documents section
In this section, you can review all documents linked to your negotiation.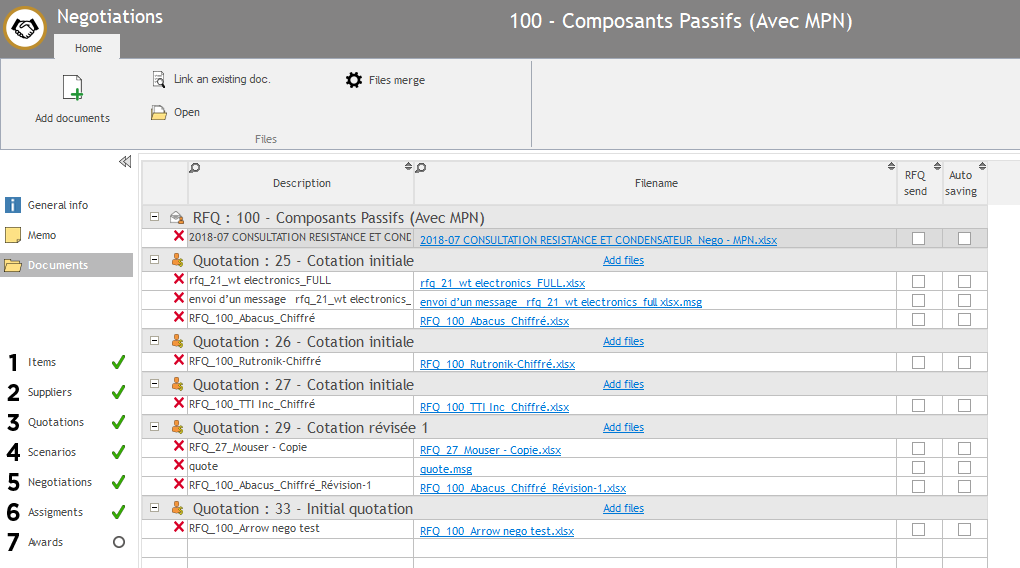
- Documents added automatically : every time you upload a document in Buymanager (for example, forecast dataset, quotations, etc.), you can find this document in this section. Therefore, you can review it if needed.
- Documents added manually : you can also add manually a document linked to the nego (for example, an information document to your suppliers). To proceed, please click on “add documents”, then select “add files” if you wish to add only some files, or “add directory” if you wish to add a complete folder. You can then review the file(s) you selected and click on “Confirm” to add it.

For each document, you can :
- Delete the document if needed by clicking on the red cross on the left.
- Send this document to all suppliers in RFQ by ticking the box “RFQ send” on the right.
Settings available in General Info
These settings are linked to the face-to-face interface : they will define information you see in this interface.
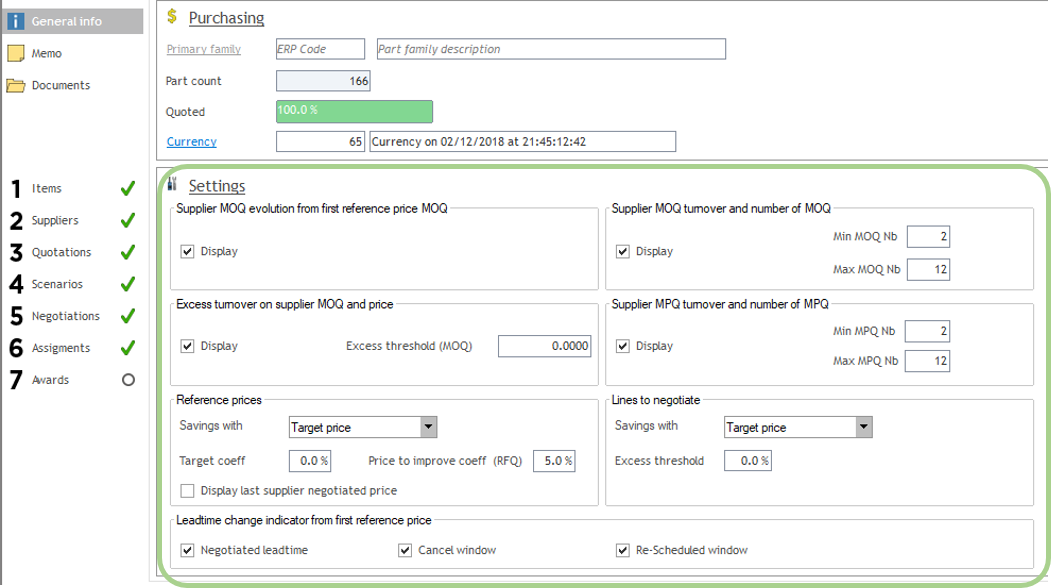
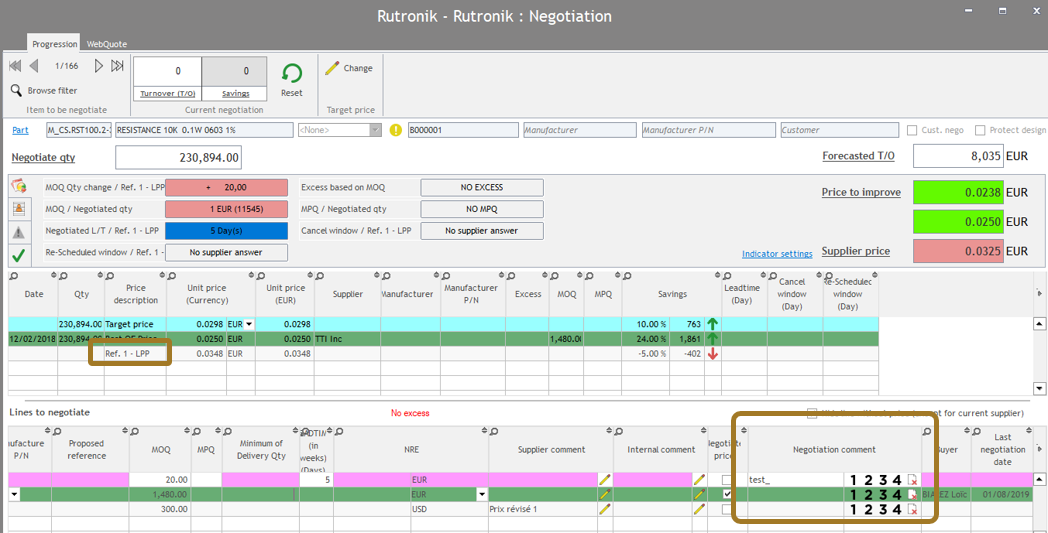
1. Settings of F2F indicators :
These settings define your face-to-face indicators (see picture below) for every F2F negotiation in the current Nego. You can also change these indicators F2F per F2F such as explained in Step 5 – 4.
As a reminder, these indicators enable you to compare your price characteristics coming from your supplier to the ones from your reference price 1.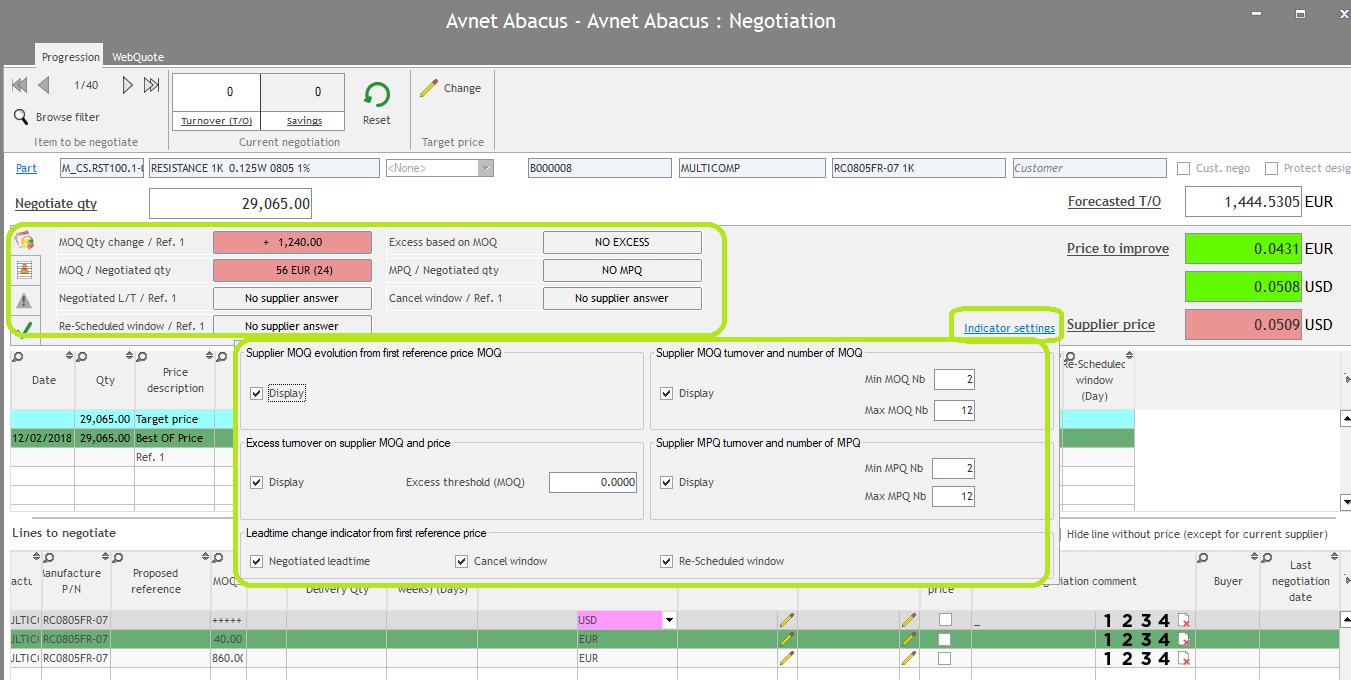
Settings explanation :
- Supplier MOQ evolution from first reference price MOQ : if you select “Display”, evolution between your supplier MOQ and your Ref. price 1 MOQ will be displayed in your F2F interface à “MOQ qty change / Ref. 1”.
-
Excess turnover on supplier MOQ and price :
- select display to see excess in quantity and in price based on supplier MOQ in your F2F interface à “excess based on MOQ”.
- Define excess threshold to activate a red alert when your excess is above this threshold (field will appear in red).
-
Supplier MOQ turnover and number of MOQ :
- if you select “Display”, supplier MOQ turnover (supplier price x MOQ) and number of MOQ (forecast quantity / MOQ) will be displayed in your F2F interface à “MOQ / Negotiated qty”.
- define the interval to show this field in green. For example, in the picture below, the “MOQ turnover and number of MOQ” will be displayed in green if the number of MOQ is between 2 and 12 (so maximum 1 per month). Otherwise, it will appear in red like in the picture (the number is 24 so it’s in red).
-
Supplier MPQ turnover and number of MPQ :
- if you select “Display”, supplier MPQ turnover (supplier price x MPQ) and number of MPQ (forecast quantity / MPQ) will be displayed in your F2F interface à “MPQ / Negotiated qty”.
- define the interval to show a red alert if figures are outside interval. For example, in the picture below, the “MPQ turnover and number of MPQ” will be displayed in green if the number of MPQ is between 2 and 12 (so maximum 1 per month). Otherwise, it will appear in red like in the picture (the number is 24 so it’s in red).
-
Leadtime change indicator from first reference price : 3 different leadtimes can be displayed in the F2F interface and will be compared to leadtimes coming from Ref. price :
- Negotiated leadtime : will display the comparison in the field “Negotiated L/T / ref.1”
- Cancel window : will display the comparison in the field “cancel windows / ref 1”
- Re-scheduled window : will display the comparison in the field “re-scheduled window / ref 1”.

2. Settings to define savings calculation in F2F interface
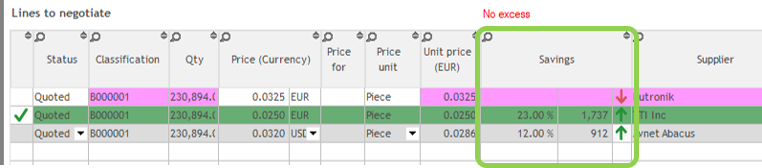
These settings “Reference prices” and “lines to negotiate” will define how to calculate savings in the F2F negotiation.

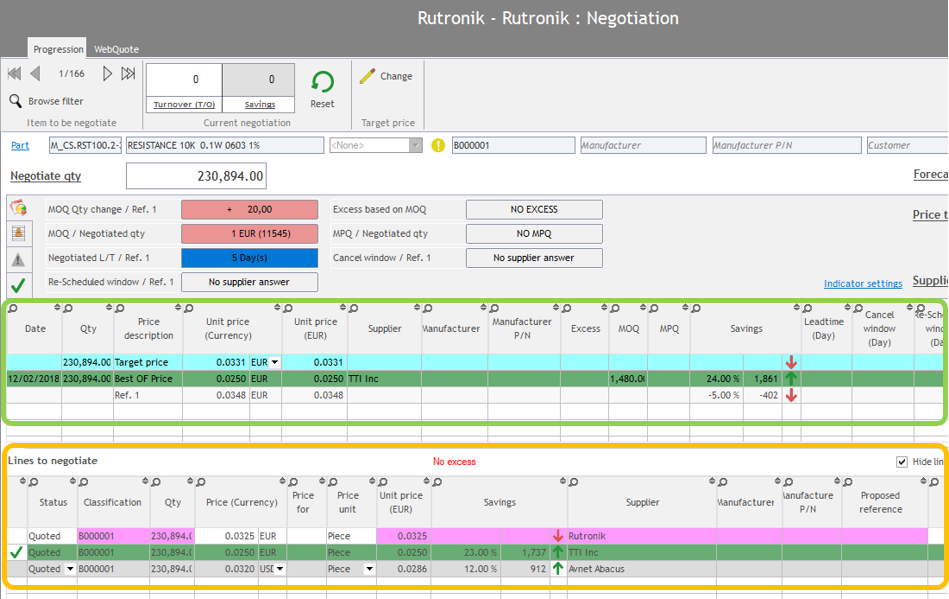
“Reference prices” concerned all prices in the middle table of F2F interface (target price, Best Of price, Ref price 1…) (see picture below in green)
“Lines to negotiate” concerned all prices in the bottom table of F2F interface (supplier price and other suppliers’ prices) (see picture below in yellow).
“Savings with” :
Select price you want to use to calculate savings for each “references prices” or “lines to negotiate” :
- Target price
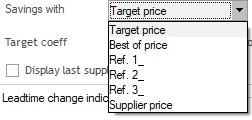
- Best Of price
- Reference price (1, 2 or 3)
- Supplier price.
2 possibilities are usually defined :
- Possibility 1 :
- Reference price : “Reference price 1” is selected
- Line to negotiate : “Supplier price” is selected à in that case, in the bottom table of the F2F interface, savings for the supplier will always be set to 0, and savings for other suppliers will be related to your supplier price. Therefore, you can directly see how your supplier with whom you are negotiating is placed compare to other suppliers.
- Possibility 2 :
- Reference price : “Supplier price”” is selected
- Line to negotiate : “Best Of price” is selected
“Target coeff” :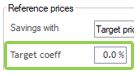
Assign a percentage in this field will reduce your target price by this percentage.
Example : your target price uploaded in your forecast dataset is 1€ and you define a 10% target coeff, then you will have a new target price of 0,9€.
Aim : usually, this setting is for internal use (purchasers only), and is used for 2 reasons :
- Set up a lower target price to see in F2F negotiation.
- Display an alert (orange warning) in Step 6 – Assignment in savings of the line are lower than the percentage defined in “target coeff”. For example, in picture below, a 10% target coeff has been defined, so an alert appears for all savings below 10%.

Note : if you select “Target price” in the drop-down list “savings with” (see above), savings in the F2F interface will be calculated based on your original Target price, and not the one with “target coeff”. For example, in picture below, my target price was 0,0331 with a target coeff of 10%. Therefore, in my middle table of my F2F interface, I can see a target price of 0,0298 with a saving of 10% compare to my original target price.

“Price to improve coeff”:
Assign a percentage in this field will reduce your price to improve price by this percentage. Aim is mainly to avoid that the Best Of supplier knows he is the Best Of (in case his price is below target price à see below).
Note : “Price to improve” is the minimum between the Best Of price and the Target price. This price is usually sent to your suppliers in a 2nd round of RFQs, when you ask them to requote your parts (see Step 3 – 4).
Note 2 : if you defined a “target coeff” and a “price to improve coeff”, the calculation for the price to improve will be : (minimum between Best Of price and (Target price minus target coeff)) minus Price to improve coeff.
Example :
- Target price : 1€
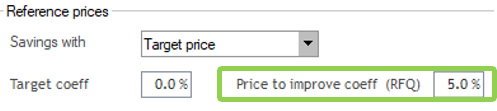
- Best Of price : 1,1€
- Target coeff : 10%
- Price to improve coeff : 5%
Price to improve will be : 0,855€
Calculation :
- minimum between Best Of (1,1€) and (Target price (1€) minus target coeff (10%)) minus price to improve coeff (5%)
- → mini between 1,1€ and 1€-10% (=0,9€) = 0,9€
- → this minimum (0,9€) minus 5% = 0,855€
“Display last supplier negotiated price” :
Tick this option to see the last ERP negotiated price from your supplier in the F2F interface, in the middle table.
Note : you can see only the most recent negotiated price coming from ERP (requires ERP synchronisation).
Note 2 : you can only see this ERP negotiated price if the supplier of this price is the same than the supplier you are currently negotiating with.

“Excess threshold”
Define a percentage which represents the maximum % of turnover that excess can reach (in value and not in  quantity). If excess is higher that this percentage, an alert will appear in the F2F negotiation.
Note : if you set this percentage to 0, you will always have a warning in the F2F interface

Global settings for all Negotiations
In Buymanager Home, you can define some settings which will affect all Negotiations and be effective for every Buymanager users.
1. How to customize information (price references name, etc.) ?
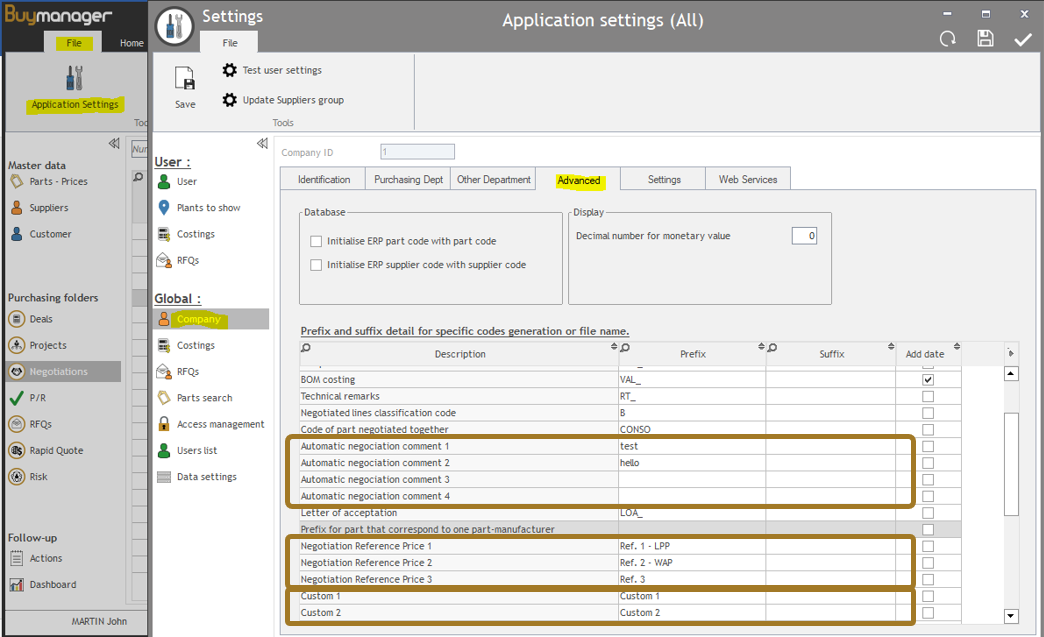
The first setting you can manage is the name’s customization. You can therefore :
- Change the price references names : for example, instead of having “Ref. 1” in every tables, you will have “Ref. 1 – LPP” because you uploaded your LPP as Ref 1 and you updated the name like this. (see below).
- Define the automatic negotiation comment that you can use in the F2F interface (seeStep 5 – 6).
- Define the name of the 2 reports to plants that you can set up (see Step 7 – 2). They are named “Custom 1” and “Custom 2” by default.
To proceed :
- Connect to Buymanager with an admin account.
- In Buymanager Home, go to File > Application settings > Company > Advanced
- In the table, select the field you wish to customize, and write the new name / comment in the column “prefix”. If your content is too long, you can use the columns “suffix” as well.
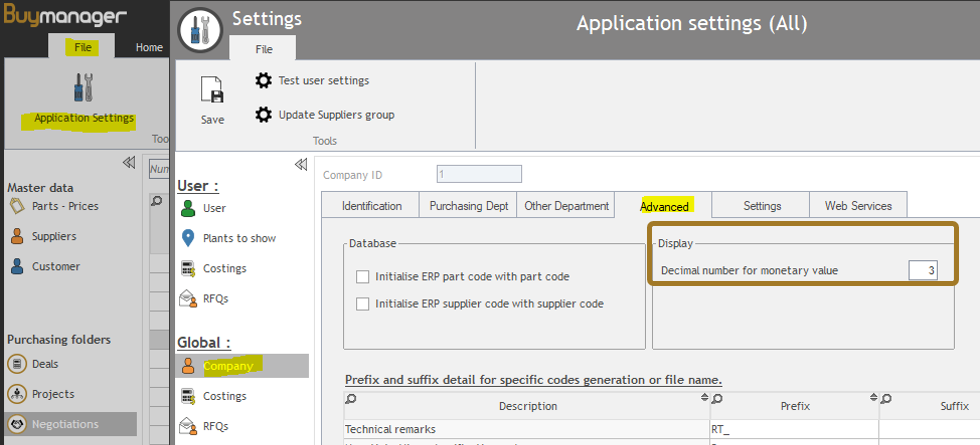
2. How to manage decimal number ?
In global settings, you can also decide the number of decimals you wish to see for monetary values.
To proceed :
- Connect to Buymanager with an admin account.
- In Buymanager Home, go to File > Application settings > Company > Advanced
On the top right, select the number of decimals you want to display.
FAQ : Frequently asked questions
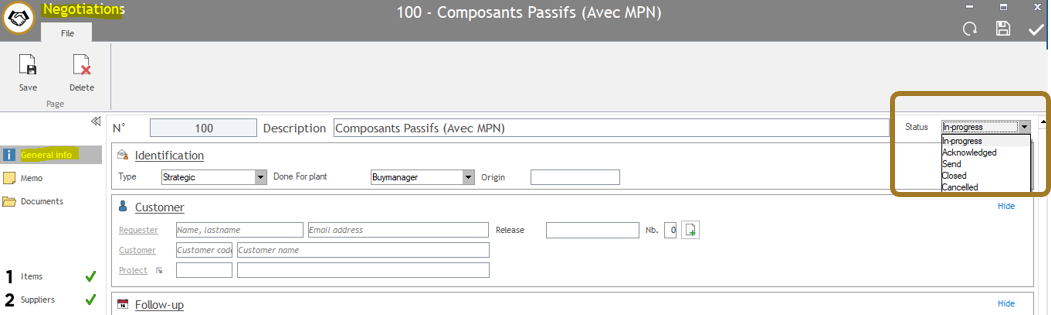
1. How to reopen my negotiation if I closed it by mistake ?
You closed the negotiation (see Step 8), but you notice that you forgot to send reports to plants for example, or that your manager would like you to improve some prices.
Don’t worry, you can change your Negotiation status and say again that it’s opened !
To proceed :
- Open the Negotiation.
- Go to General Info.
- Change the status from “closed” to “in-progress”.
2. How to update my currency rate ?
As a Negotiation can be performed on several months, currency rates are not updated automatically to enable you to compare prices without currency rate’s impact.
Therefore, when you create a Nego, you can set up your currency rates for the Nego (see Step 0).
But you still can update these currency rates manually if needed. For example, your Nego lasts for 3 months now and you would like to see the actual currency rates’ impact. Or, there is a big change on one rate (for example EUR / USD) and you would like to reflect it in your Nego.
To proceed :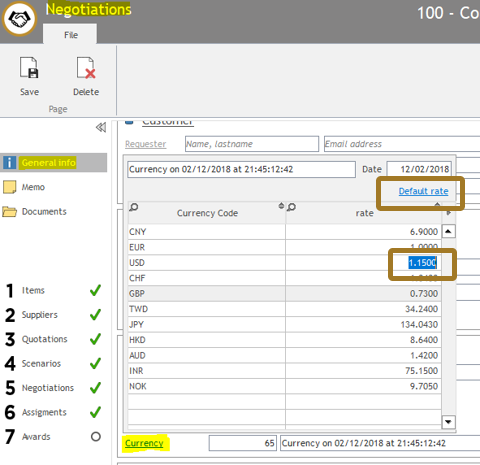
- Open your Negotiation and go to General Info
- Click on “currency” to see currencies as defined at the creation stage (see Step 0).
- Manually update the rates : double click in one rate and change it manually.
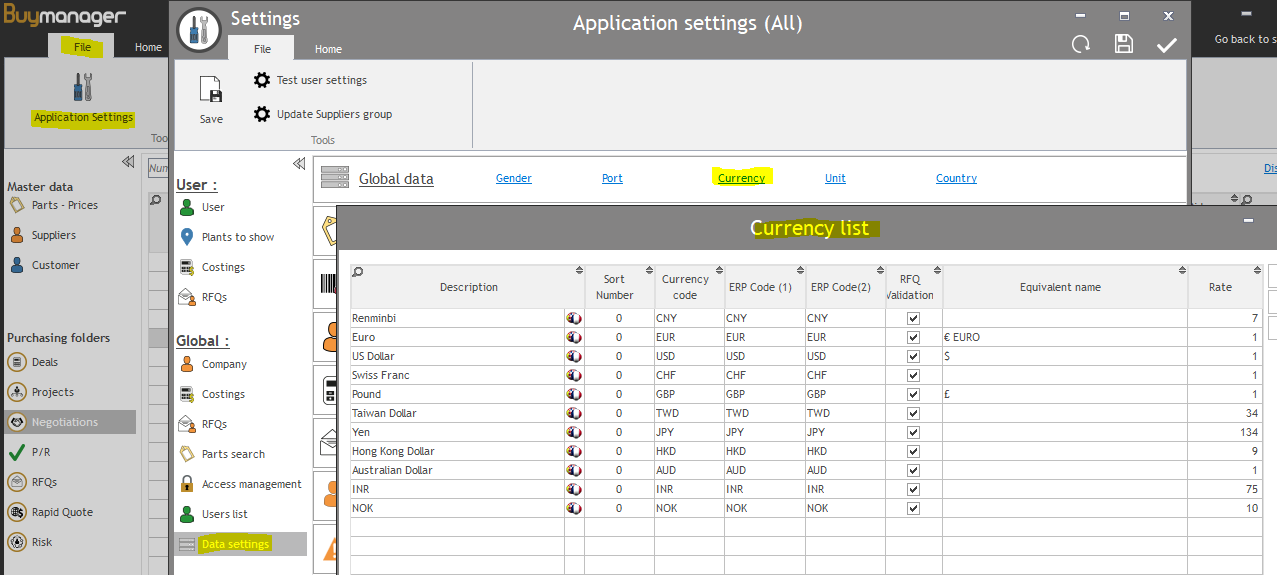
- Update currency rates based on Global Buymanager currency rates : to proceed, click on “default rate” on the top right of the table. Therefore, the currency rates will be the same as the ones you have for all Buymanager and that can be linked to your ERP if you have an ERP-BM synchronization. To check these global currency rates, go to Buymanager home > File > Application settings > Data settings > Currency.
3. What are my different prices available in Negotiation ?
In the Negotiation module, a lot of prices are available to enable you to compare the new prices from your suppliers to others. All these prices are available per component.
Below is a summary of these prices :
- Ref 1 & 2 & 3 : you can use these 3 prices to upload every price that you would like to use as a reference in order to compare your supplier price. Usually, companies upload WAP, LPP and negotiated price from previous year. It’s included in your forecast and uploaded in Step 1.
- Target price: this is the price you would like to reach this year. It’s included in your forecast and uploaded in Step 1.
- Best of : it’s the better price between all the supplier prices. This price is available only after receiving few quotations and clicking on “Best Of calculation” in the Step 3. It’s a BM calculation.
- Price to improve : it’s the minimum between the Best Of price and the Target price. This price is usually sent to your suppliers in a 2nd round of RFQs, when you ask them to requote your parts (see Step 3 – 4). It’s a BM calculation. In your Nego’s General Info, you can add a coeff to reduce this price to improve (see Settings available in General Info)
- Supplier price : it’s the price given by the supplier in his quotation. It’s loaded into BM when you upload the quotation.