Thanks to this summarized process, you can fast review the different steps to conduct a Negotiation in Buymanager.
Summarized version
Afin de bien démarrer vos négociations périodiques, voici la liste des activités à mener avant le lancement de vos Négos.
Cette liste vous redonne également le lien vers la documentation si nécessaire. à Télécharger la check list. Télécharger la check list
En complément de la liste précedente, le lancement de vos négociations périodiques nécessite de définir votre stratégie de négociations et les paramètres qui en découlent :
Quelles familles et quel périmètre négocier, devez-vous consolider les articles, etc.
Voici la liste des questions à se poser avant d’engager vos Négos, et le lien vers la documentation si nécessaire. Télécharger la check list Strategy & Settings
Step 0: Create a Negotiation
- From Buymanager home, click on “create a negotiation”.
- Complete your Nego information (title, currencies, etc.)
- Create your Nego
Step 1 – Items: Import your forecast dataset coming from ERP
- Prepare your dataset (excel data) to import in Negotiation Module: part code, prices & suppliers from last year, quantities for the year to come…
- Click on Import your data
- Map your Excel columns with BM fields
- Decide to consolidate same sources for your forecast parts or not to consolidate
- Check the statistics from your data
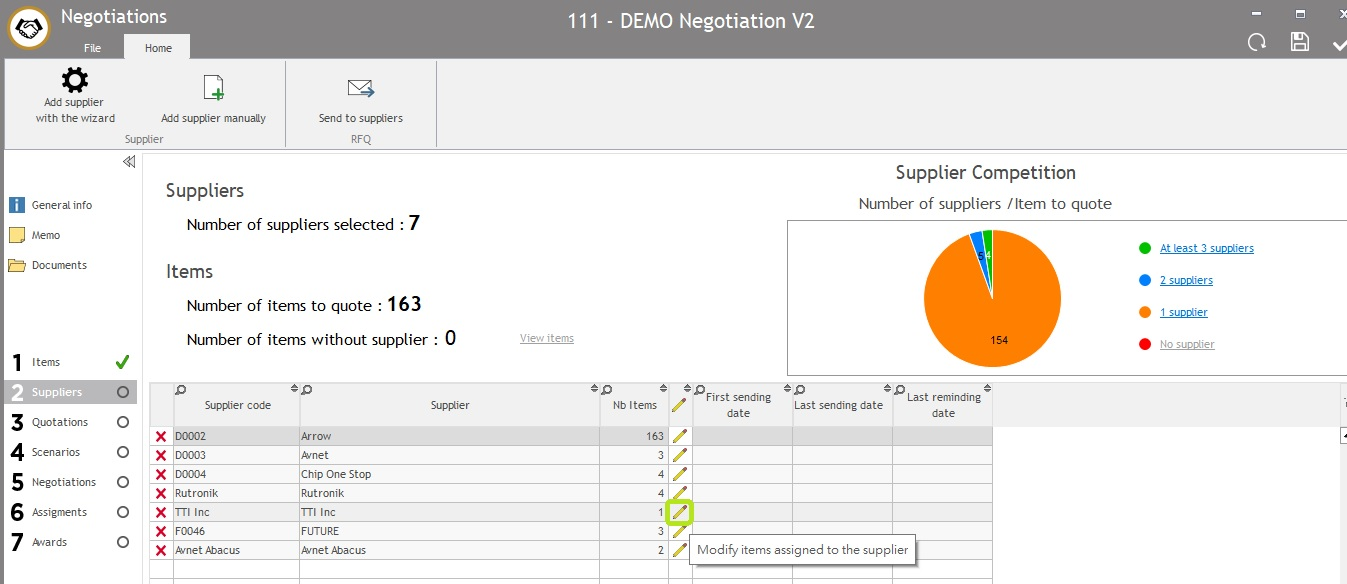
Step 2 – Suppliers: Define suppliers to request and send the RFQs
- Define suppliers to request thanks to the wizard, based on different criteria:
- Reference price
- Family
- Linecard
- Directly request manufacturers
- To complete the list of suppliers, add suppliers manually one by one or via a supplier list
- Check that every item is sent to 1 supplier at least
- Manage your suppliers and your list of items: adjust the items for each supplier if needed, delete/add suppliers…
- Send RFQs to suppliers
Step 3 – Quotations: Manage your quotations
- Upload your quotation received from your supplier
- If needed, correct import errors: currency missing, currency not recognized…
- Check your quotation: prices, proposed sources, leadtime…
- If needed, change information directly in the quotation in BM.
- After receiving some quotations, calculate the Best Of.
- If needed, remind your suppliers.
- If needed, ask your suppliers to requote.
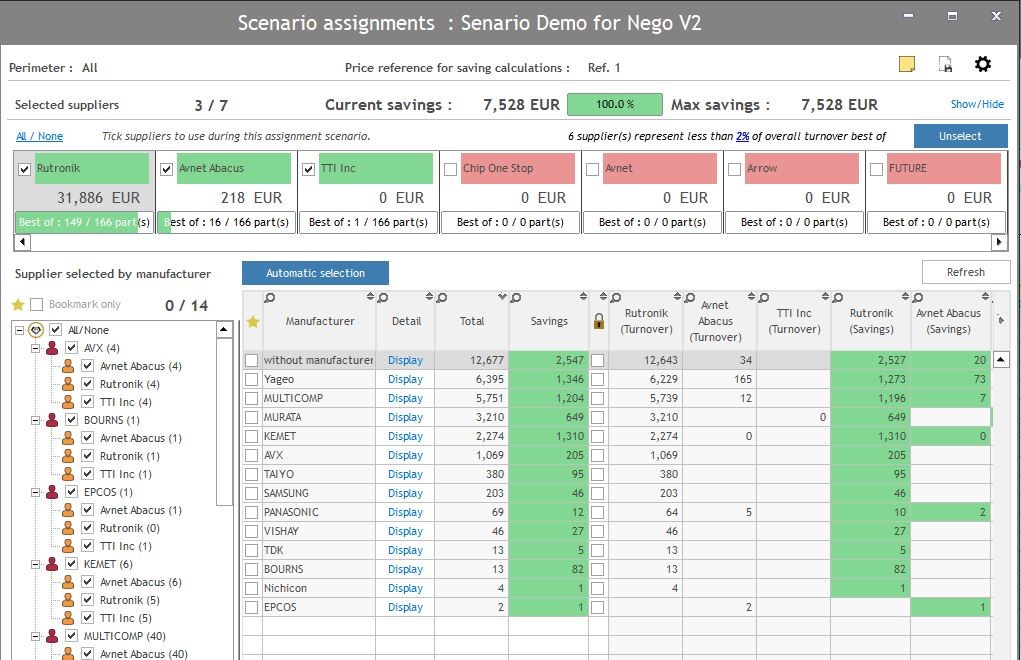
Step 4 – Scenarios: Manage your scenarios
- Create a scenario.
- Reduce the total number of suppliers: unassign suppliers who represents a low Best of (for example, less than 2% of the Best Of turnover).
- Define the global number of suppliers per manufacturer by using the Automatic Selection.
- Manage your suppliers manufacturer by manufacturer by using Bookmarks.
- Manage your suppliers items by items for each manufacturer by clicking on Display.
Step 5 – Negotiations: Face to face negotiation
- Select the supplier with whom you’re going to negotiate
- Check that the selected quotation is the correct one. If not, change it with a right click.
- Copy the original quotations before negotiation to compare later the difference between before and after the F2F negotiation (click on “save the quotation”).
- Review some statistics per manufacturer for this supplier by clicking on Display.
- Open the F2F window manufacturer per manufacturer or for the complete list of items for this supplier.
- For each item, review all information you’ve got and negotiate with your supplier.
- Change price or other information in real time for each item negotiated.
- If you wish, assign item to supplier.
Step 6 – Assignments: Assign a part to the suppliers
- Check all the information for each part (price, MOQ, leadtime…): all this information is coming from the Best of supplier if there is no assignment. If an assignment is done, information is coming from the assigned supplier.
- Assign a supplier for selected items, based on:
- Best Of supplier
- Reference price 1 supplier
- Scenarios
- Face-to-face negotiation
- Manage assigned supplier (Add a comment, change supplier, delete award…)
Step 7 – Award: Award suppliers based on assignments
- Check all the columns and approve assignment based on different options:
- All: All the lines are approved according to the assignment (Step 6)
- Saving: Approve only the lines with savings compare to reference price 1.
- No Ref 1: Approve the lines according to Reference price 1 supplier
- Supplier: Approve only the lines assigned to this supplier.
- Send the final report:
- To plants: choose between the 2 customized reports to export data from the Negotiation and send them internally (for example to plants, or to ERP)
- To suppliers: send the summarize of items awarded to each supplier (LOA).
- Close your negotiation.
Negotiation process – detailed version
In this detailed version, you are going to review all the Negotiation steps in detail: where to click, what are the different possibilities, Q&A, etc.
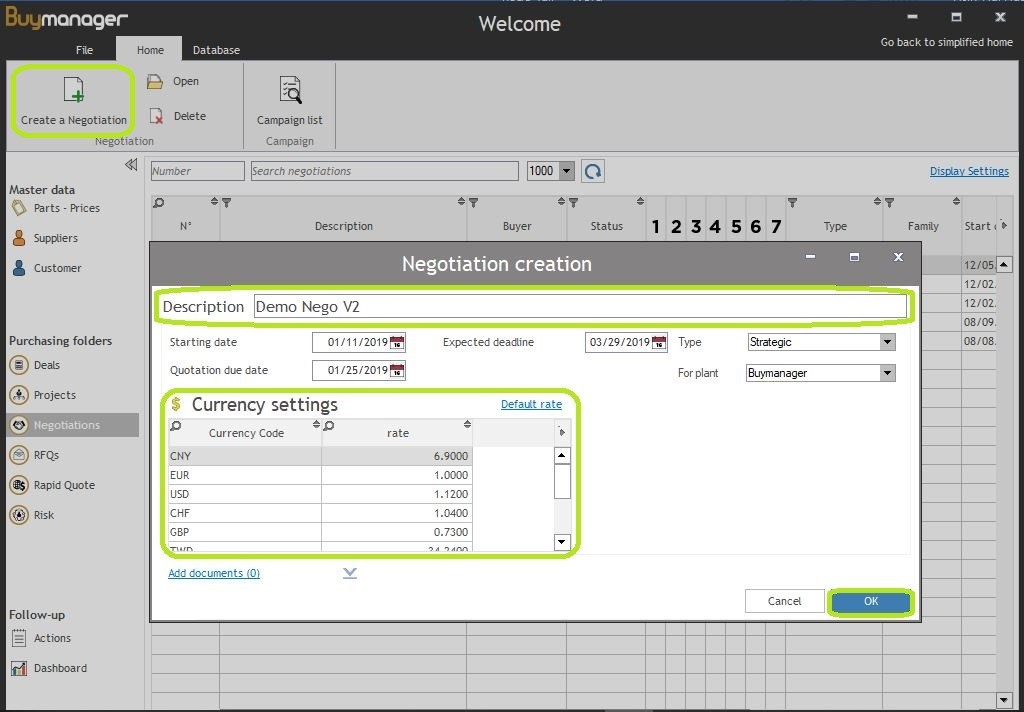
Step 0 – How to create a Negotiation?
- Connect to Buymanager and go to the Negotiation Module.
- Click on “Create a Negotiation”.
- Then fill in the different information of the Negotiation:
- Description: name of your Negotiation
- Starting date: Negotiation starting date, usually it’s the date of the creation
- Quotation due date: suppliers need to send their quotation before this deadline
- Expected deadline: the negotiation needs to be finished for this date.
- For plant: define the plant for which the negotiation is done.
- Currency settings: define the currency rate for the whole period of the negotiation. You still can change it later manually if needed.
- Press “OK”
Note : The Negotiation will use the RFQ template by default, so you need to check before creating your Nego that this template by default is the good one.
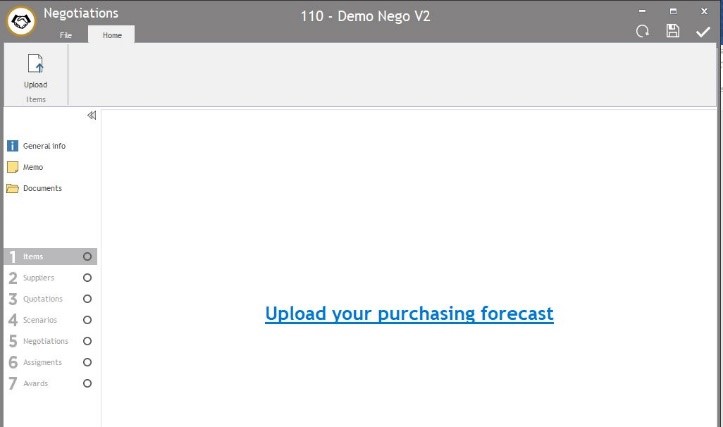
Step 1 – Items: How to upload your dataset in BM?
Goal: The aim of this first step is to upload your dataset into Buymanager, define some choices related to your data such as the consolidation, and check some statistics. This step is the most important one because if an error is done here, it will impact the complete negotiation.
1. Process : how to upload your dataset ?
-
Prepare your dataset with all your data: part code, information from last year (prices, suppliers, MOQ, leadtime…), quantities for the year to come, target price, up to 3 r
 eference prices, …
 - In your Negotiation >> Section “Items“, click on “Upload your purchasing forecast” or on “Upload”.
- Select the Dataset file (the format can be .xls, .xlsx, .csv, .txt.)
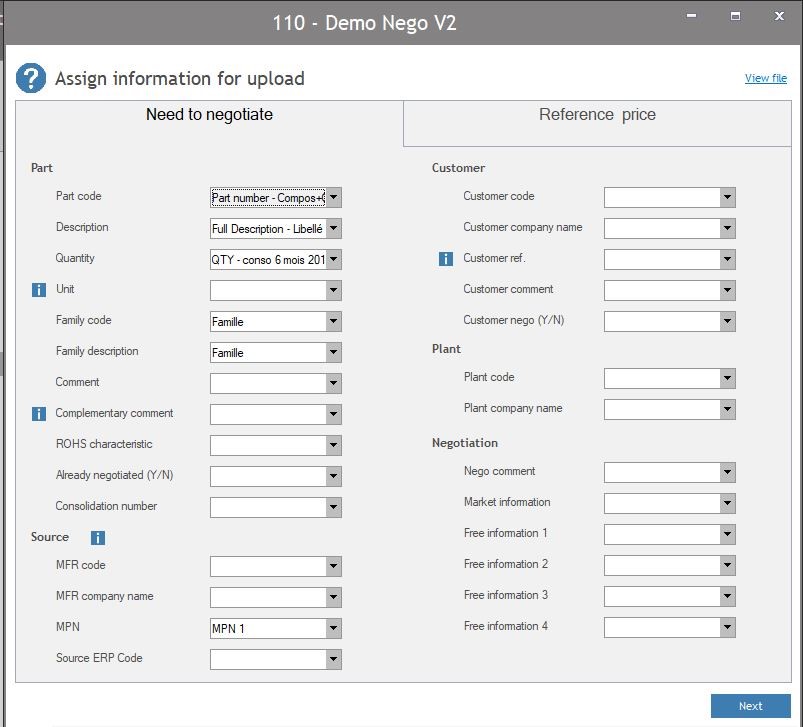
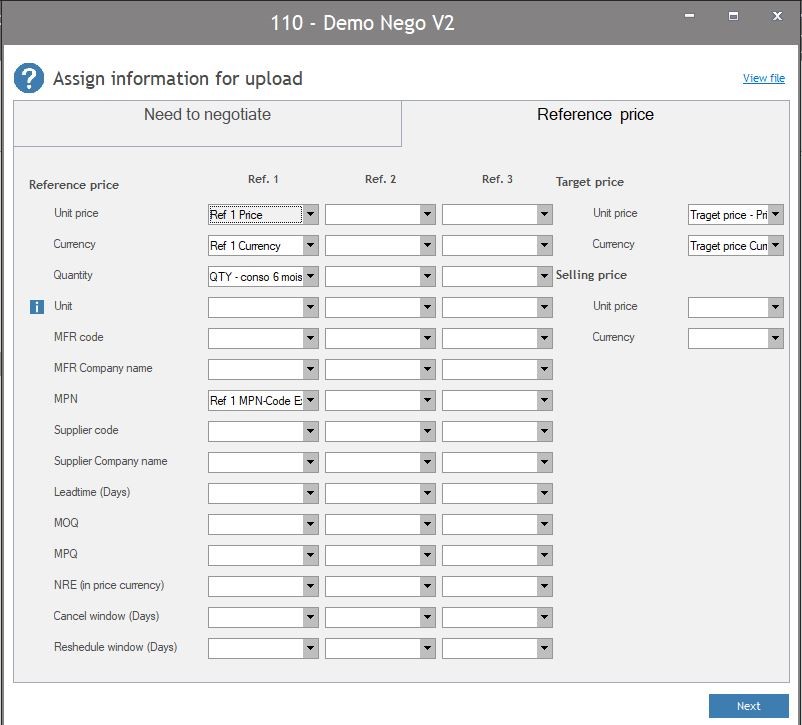
- Map the columns: for each field, select the column header from your dataset. 2 slides are available here :
-
- Needs to negotiate : map all information linked to your part, such as the part code, description, forecast quantity, unit, source, customer, …
- Reference price : you can upload up to 3 reference prices. These reference prices can be your last year negotiated price, your WAP (weight average price), your LPP (last purchased price)… In this view, you can upload all information for each reference price, such as price, currency, supplier, source, MOQ…
Note : A red warning means that the column is mandatory :

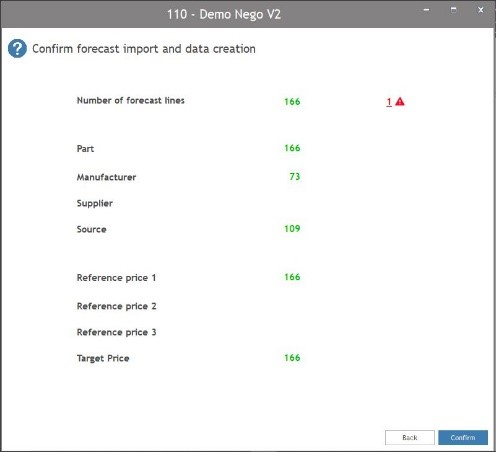
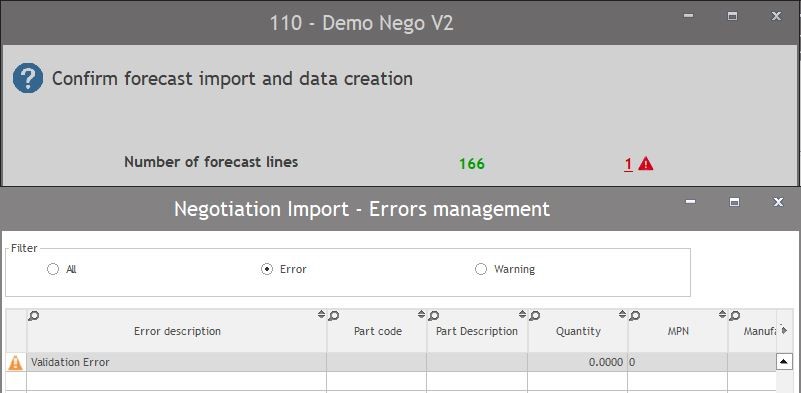
5. Click on Next and confirm forecast data : check the figures which appear to see if your mapping is done correctly or not. In case some errors appear, click on the red warning to review the error in detail.
- Example : In that example below, the quantity is 0, that’s why there is a warning
-
- Note : All lines in errors will not be uploaded
-
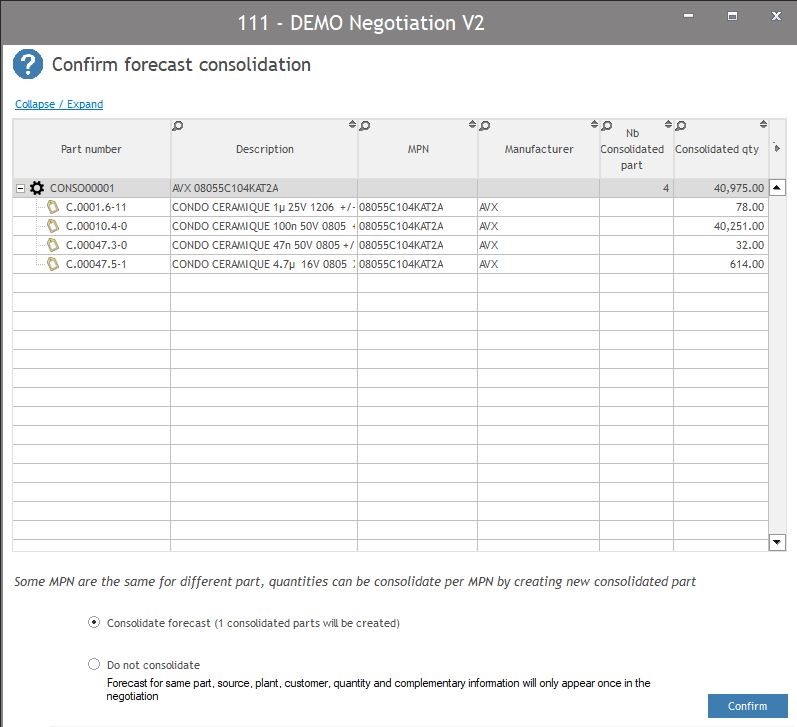
6. Decide if you wish to consolidate in case you have some sources in common through different parts a for more information, click here.
-
- Yes : Buymanager will create a new part number with a “CONSO” prefix and regroup the forecast quantity under this new part.
- No : Buymanager keeps your original parts and do not do any changes.
7. Click on Confirm : the import is finished.
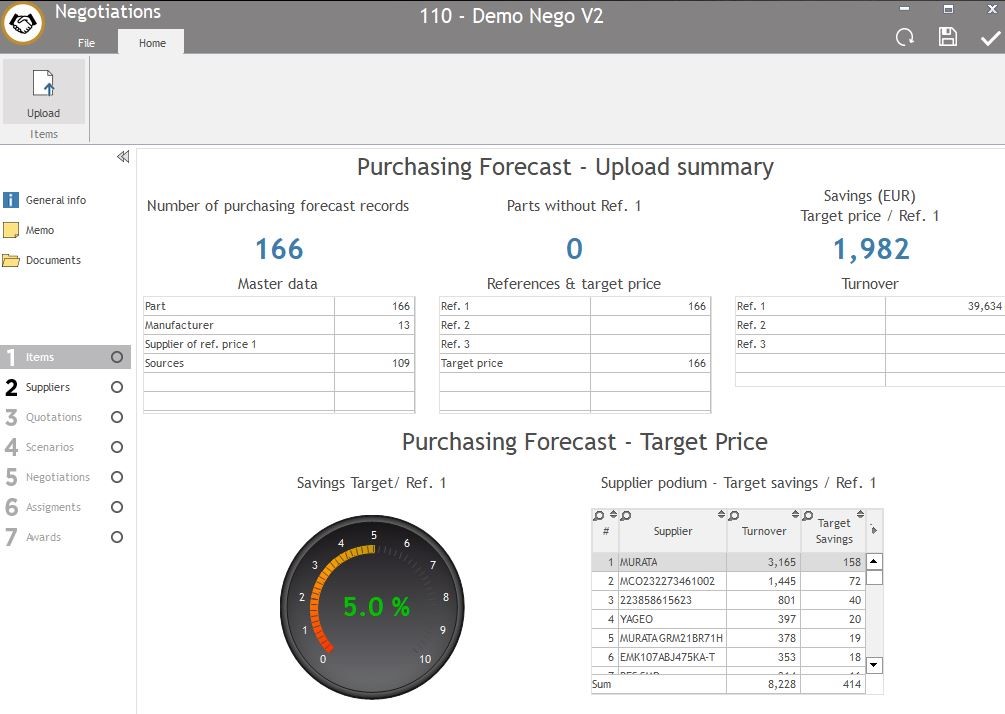
8. Check the Upload summary of your purchasing forecast dataset in “Items” :
-
- Master data: Total number of parts, manufacturers, suppliers and sources. Some numbers can be different than in your dataset because of the consolidation and the import errors.
- References and target price : number of prices for each reference price and for the target price.
- Turnover: Automatically calculate your turnover for each reference price à it’s the reference price multiplied by the forecast quantity for the total number of items.
- Savings Target price / Ref1: Automatically calculate your savings turnover à it’s the reference 1 turnover (reference price x forecast quantity) minus the target price turnover (target price x forecast quantity)
- Supplier podium – Target savings / Ref1: Automatically calculate your savings turnover per supplier, based on the target price and the reference 1 price (same calculation as the “Savings Target price / Ref1”).
2. More information : Mapping example
Below is an example with a demo dataset :
Dataset in Excel :

Mapping in Buymanager :
3. More information : consolidation in BM
In Buymanager, during the import step, you can choose to consolidate your parts or not.In case you’ve got multiple parts with same source (MPN + manufacturer), you can decide to consolidate these parts together.
In that case, Buymanager will create a fake part (CONSO0001 for example) for the source in common through the different parts. This CONSO0001 will regroup the quantities from the original parts.
Therefore, the forecast quantity will be higher, so you can get better prices, MOQ etc. from your suppliers.
Note : The consolidated part CONSO001 will be used through the whole negotiation and will be split into the original parts at the end, in the assignment steps and in the final reports.
Example :
There are two parts ABC and EDF with 2 sources each and 2 different quantities. One of these 2 sources is common : “MPN1” and “Murata”.
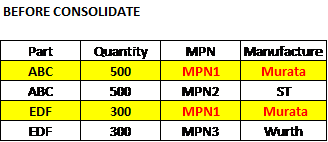
If you choose “Consolidate forecast”, you will get a new part number “CONS00001” which will combine ABC & EDF quantities to “800” for the source MPN1 & Murata only. This new part will be used through the whole Nego process, so will be sent to suppliers. The other MPNs will be kept in the original part because they are not common.
Table below show what will be sent to suppliers, and the quotation from suppliers :
Buymanager will select the best price for each part between the different sources :


4. Tracking Status:
After this step is finished, change its status with a right-click on “Items” in order to follow-up more easily.
![]()
Step 2 – Suppliers : How to define suppliers to request and send RFQs?
-
Add suppliers to request: you have 2 possibilities (links in blue in the middle or buttons on the top) :
- Add suppliers with the wizard
- Add suppliers manually
-
If you choose “add supplier with the wizard”, it will request suppliers on selected items. The list of items will be based on different criteria :
- Defined in Ref 1: you will request the supplier from the Reference Price 1 for each part.
- Defined in Part Families: if you defined a family for your parts, you can request the suppliers linked to this family for each part. You can request based on your priorities (only suppliers rank 1, or both ranks 1 & 2…).
- Defined in Linecard: you will request each part based on the link distributor – manufacturer. Therefore, if your part has 2 sources Murata & ST, you will request on this part suppliers defined for Murata and the ones defined for ST.
-
- Request directly manufacturers : you will request manufacturers of your part. Therefore, if your part has 2 sources Murata & ST, you will request on this part Murata & ST.
NOTE : Total number of selected suppliers can be different than a basic addition because you can have suppliers in common between the different options. For example, in the picture below, a basic addition gives 9 suppliers selected, but in real the total is 7 because 2 suppliers are common between family strategy and linecards.
3. If you choose “add supplier manually”, it will request a supplier on all items. You have 2 options :
-
- Add supplier one by one by clicking on “supplier search”, then type his name or his code in the search bar, then click on Select on the right.
-
- Add a supplier list by clicking on “pre-set suppliers list” : you can define different list of suppliers you’d like to request on all items. Therefore, you can directly assign 10 suppliers at once. You can create a new list, delete or modify an existing one.
Note : If needed, you can create a new supplier by clicking on Create in the different views.
4. Add suppliers to request for items with 0 or 1 supplier defined in order to have competition on each item.
-
- Press “1 supplier” for example to see items with only one supplier defined.
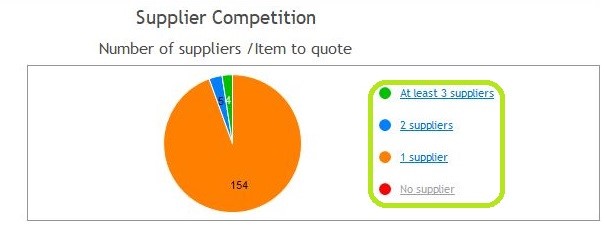
-
- Tick the items you want to be requested and select the supplier you wish to request : press ”Add a supplier” then enter the name in “Search the supplier”.
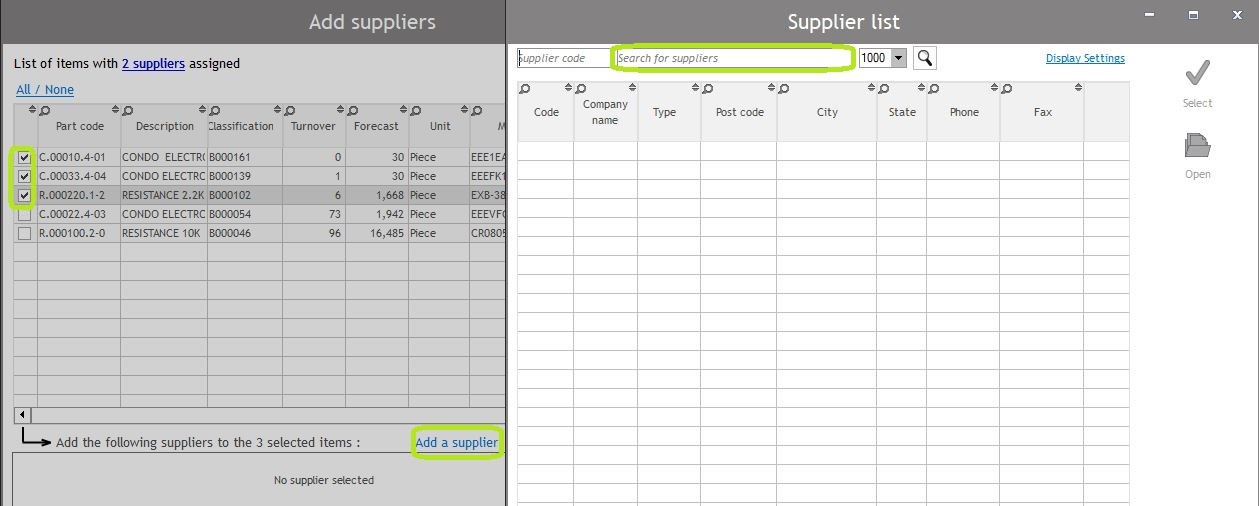
-
- Select, then add other suppliers if you wish or confirm the change.
Note: If you have a yellow sign, that’s because you already sent RFQ before, so you can’t cancel it.

5. Manage items for each supplier if needed, by clicking on the pen next to the supplier name. therefore, you can change the items on which the supplier will be requested (add items or delete some).
6. If needed, delete suppliers by clicking on the red cross on the left.
7. Send RFQs to suppliers by clicking on “send to suppliers” in the top header.
-
- Fill in the body of the email (Multi-language if necessary)
- It is possible to save and load template for email body by clicking on buttons “save template” or “load template” in the top header.
- You can also add generic code to customize some information in automatic, such as supplier name, supplier address… To do it, right click in your email body and select “add a generic code”, then choose the one you wish to add.
- Complete supplier contacts if necessary.
- Select suppliers to whom send the RFQ (tick the case on the left).
- Click on the “Send” button on the top left. It will enable you to review each email before sending it to supplier.
- Fill in the body of the email (Multi-language if necessary)
Note : You can tick “automatic email sending” on the top, but in that case, you can’t check emails before sending. Therefore, all emails will be sent on the same time, which can require some time if yours RFQs are big. We recommend not to tick this field while you don’t feel comfortable with BM.

8. Close the view “send RFQ”, then change the step’s status with a right click on “Suppliers” in order to follow-up more easily.
![]()
Step 3 – Quotations : How to manage quotations?
1. Process : How to upload a quotation?
When your supplier sends you back his quotation, you need to upload it into Buymanager. Here the process to explain how to manage it.
- Check the quotation from your supplier : it needs to be in the original Excel file that you sent to your supplier by email in the step “send RFQ” above. Otherwise, it can’t be uploaded.
- To upload the quotation from your supplier, in the Quotationssection, click on “Upload” button on the top left.
- Select the supplier quotation file (Excel file).
-
Fill in missing information and click on “OK”:
- Description
- Validity end date
- Quotation reference
- Add a comment
- Add documents such as a PDF if needed

-
Check import errors if needed, such as a currency missing. If no import errors, you will see a “no alert”. If there is at list “1 alert”, click on the white button below, then correct errors.
- Check data of the quotation by clicking on “Display data”, such as prices, MOQ, leadtime, proposed sources.

Note : You can change manually all information if needed, for example in case your supplier did a mistake on 1 price. There’s no need to upload again the excel file.
Note : Proposed sources will be an information only, you can’t create these proposed sources in BM. If you wish to reject them, you need to reject the price in the column “price status” (if you don’t see it, right click on the table > select columns > click on the arrow on the bottom).
7. Once you’re done, save and close the quotation.
2. How to manage the different quotations?
After uploaded the quotations, you can manage your different quotations, see some statistics, filter quotations…
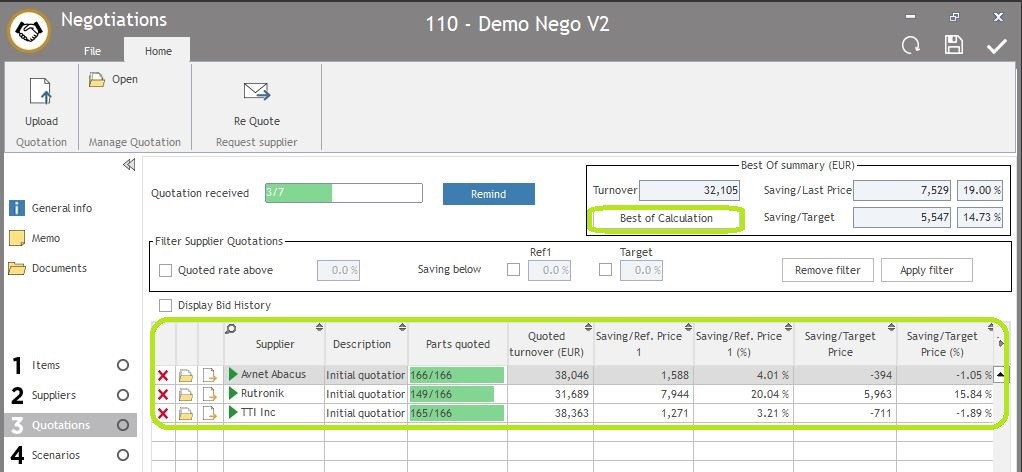
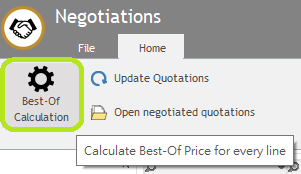
- Calculate the statistics by clicking on “Best of Calculation”button In the Quotations section : it will automatically calculate some statistics such as the number of parts quoted, the turnover, the saving prices compare to the reference price 1 or the target price, etc… It will also calculate the Best Of supplier (and price) for each item, which will be useful in the next steps.
- You can then filter the quotations you want to display by using the “Filter Supplier Quotations”:
-
- Quoted rate above: Tick and fill the “percentage” will filter quoted with a percentage of parts quoted above the percentage you ask.
-
- Saving below: Tick and fill the” percentage” for “Ref1” or “Target” will filter quotations and show you the ones with savings compare to Ref 1 under the percentage you asked (and same for Target).
-
- Then click on “Apply filter”.

3. When this step is finished, change the step’s status with a right click on “Quotations” in order to follow-up more easily.
![]()
3. How to remind suppliers?
You can remind your suppliers to send you their quote if needed.
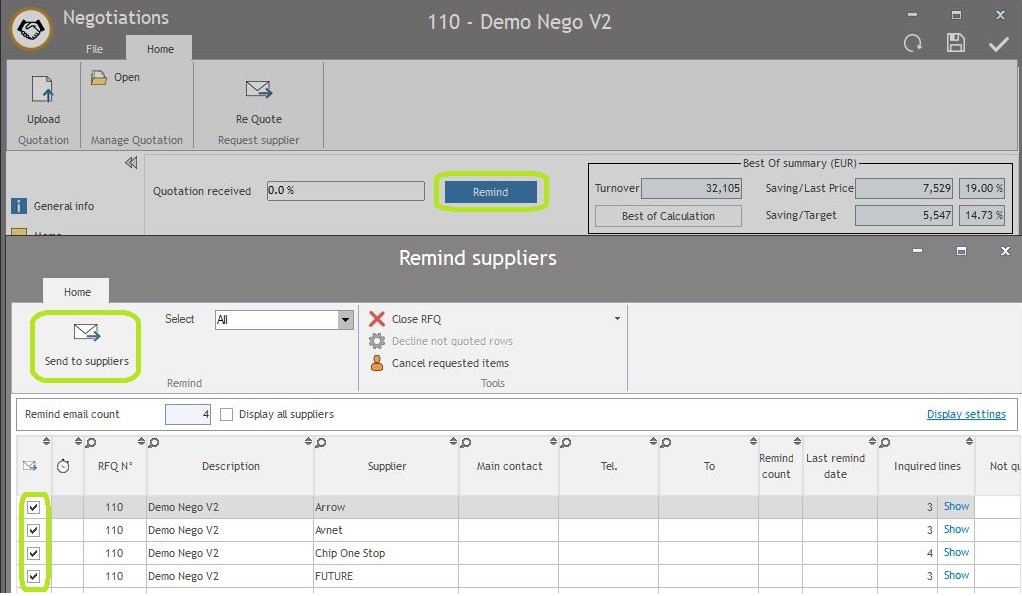
- In the Quotations section >> click on “Remind” button.
- Check the data for each supplier : number of items you requested, number of items they quoted…
- Based on these data, select the suppliers you wish to remind by ticking the box on the left.
- Click on “send to suppliers” : you will access to the “send RFQ” window which is the same than in Ste 2 – Suppliers : email to write, contacts to add, tick supplier, then send.
Note :suppliers will be requested only on parts they didn’t quote. They will therefore receive a partial Excel file.
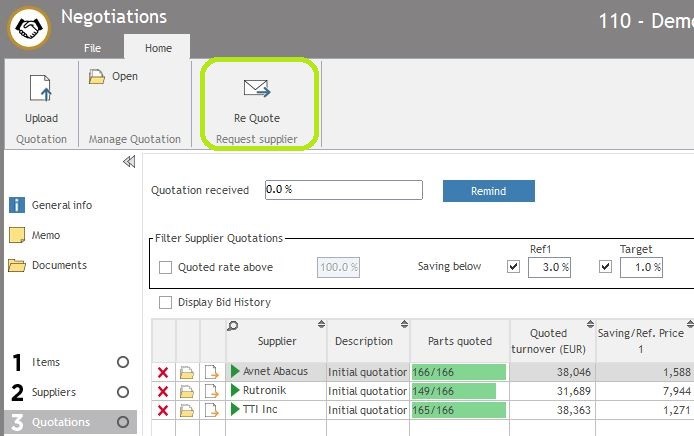
4. How to ask suppliers to requote?
When you receive a quotation, you can wish to ask again your supplier to quote because it doesn’t fit your expectations.
Therefore, you will click on “Re Quote” button and select the suppliers you would like to requote.
These suppliers will receive the original quotation they sent, so they just need to change some information.
Then, you will upload the new quotation in Buymanager, so you’ll have 2 quotations from the same supplier.
Note : You can decide to add some information to these requote, such as the Best Of price or the Target price. To do this, your administrator needs to change the RFQ Template.
5. How to manage a quotation sent in several times?
Sometimes, a supplier sends you the quotation in several times, so you can start to work on his prices while he continues to complete your RFQ. Therefore, you will first receive half of prices, then the other half of prices.
You have 2 possibilities here :
-
The supplier sends the new half of prices in the same quotation than before. Therefore, you have one complete quotation at the end.
- In that case, just upload this new complete quotation by following the previous process. You will therefore have 2 quotations in BM, and you will decide to use the last one to negotiate in Face to face.
-
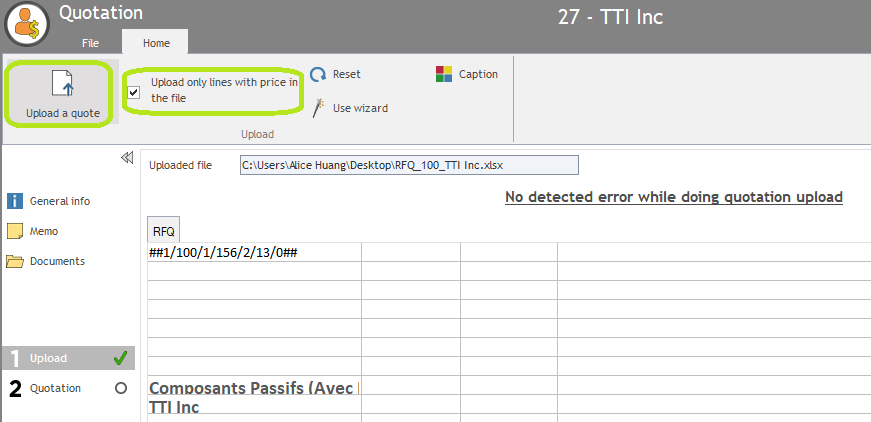
The supplier sends the new half of prices in a different quotation than before. Therefore, you’ll have one Excel file with half of prices that you already loaded into BM, and another Excel file with the other half of prices.
- In that case, you need to upload the quotation in the previous one that you already have in Buymanager.
- Therefore, open the already existing quotation, go to step 1 “Upload”, then tick “Upload only lines with price in the file”, then click on “upload a quote”.
Note : You need to have only 1 complete quotation per supplier in order to do the next steps.
Step 4 – Scenarios : How to manage Scenarios?
Goal: Scenarios enable users to see impacts on savings of different purchasing strategies : 2 suppliers maximum per manufacturer, 5 suppliers maximum in global… Thanks to scenarios, users can better build their negotiation strategy.
1. Process : How to create a new scenario?
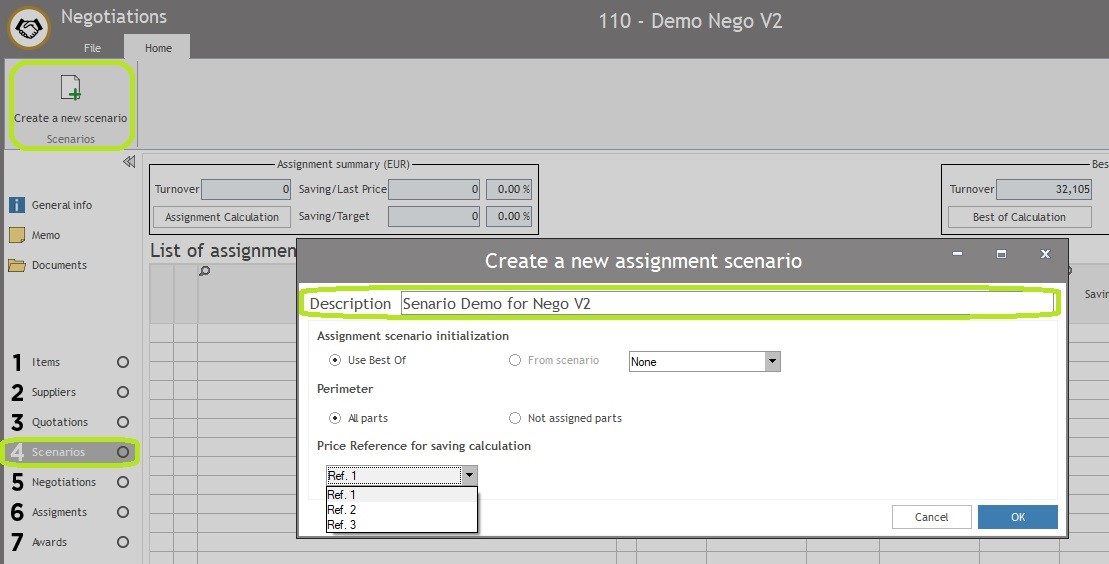
- In the step 4 “Scenario”, click on “Create a new scenario” on the top left.
-
Define your scenario characteristics :
- Description: name of your scenario
-
Assignment Scenario initialization:
- “Use Best Of” : your scenario will be based on the Best Of price (this best of is calculated automatically when you click on “best of calculation” in Step 3).
- “From Scenario”: your scenario will be based on another scenario which is already created. It’s a duplication. Please note that you can’t use this choice in the first scenario because there is no other scenario).
-
Perimeter:
- “All parts” : your scenario will be based on all your parts.
- “Not assigned parts”: choose this option if you create a scenario after the Step 6 – Assignments. Therefore, your scenario will be based only on parts which are not already assigned.
- Price Reference for saving calculation: decide which reference price will be used to do saving calculation
2. Process : How to manage your scenario ?
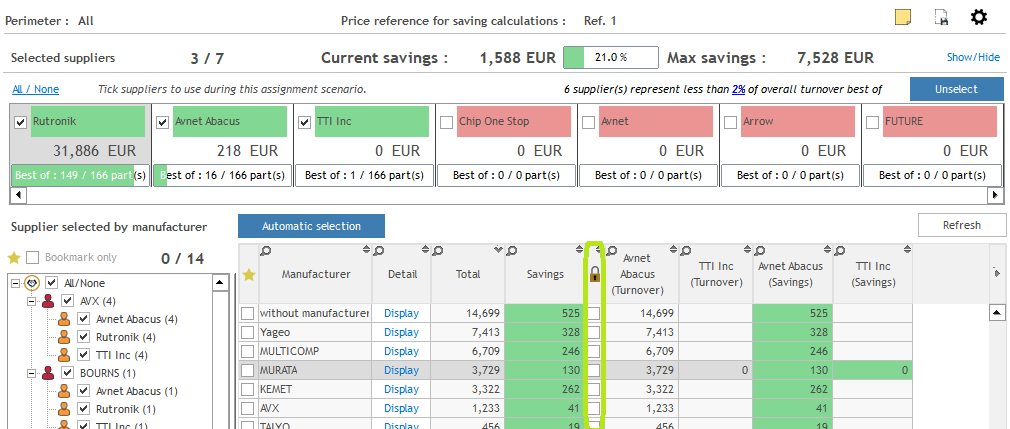
Note : Scenario will mainly help you to see impact on savings if you reduce the suppliers’ number. Each time you decide not to work with a supplier (so you unselect him), the parts on which the supplier was Best Of will be ‘assigned’ to the next Best Of supplier, and savings will be recalculated accordingly. Therefore, your “current savings” on the top will change, and you can see how much you ‘loose’ compare to the maximum savings you could have if you selected all Best Of suppliers without changing anything.
- Once your scenario is created, check information to have a global overview of the situation :
- Review the perimeter and price reference to be sure that everything is ok (completely top of the page).
- Check the number of suppliers and the maximum savings (on the top).
- Have a look to the main suppliers and to the repartition of suppliers per manufacturers (tables in the middle).
- Then, reduce the global number of suppliers to assign. Indeed, some suppliers are best of on a small percentage of the global turnover, so if you assign your parts based on best of, you will have to manage these suppliers for only few parts which will not be interesting in terms of TCO (cost of orders, cost of managing these suppliers, etc.).
-
Automatically unselect suppliers who represent less than a defined percentage of best of turnover, for example 2% :
- Set the percentage at less than “%” of overall best of turnover.
- Press “Unselect” to unselect the supplier under the percentage.

- Then, adjust manually the selection by unselecting or selecting some suppliers :
-
Automatically unselect suppliers who represent less than a defined percentage of best of turnover, for example 2% :

3. Reduce the number of suppliers per manufacturer for the same reason that above.
Usually, users assign 2 or 3 suppliers per manufacturer.
a. Automatically reduce suppliers to a maximum number of suppliers per manufacturer. Therefore, click on “Automatic selection” to define this maximum number, then confirm.
Note : If you had for example 3 suppliers and you wish to have only 2 suppliers per manufacturer, BM will unselect the supplier with the lowest turnover, and assign his parts to the Best Of supplier between the 2 suppliers remaining.

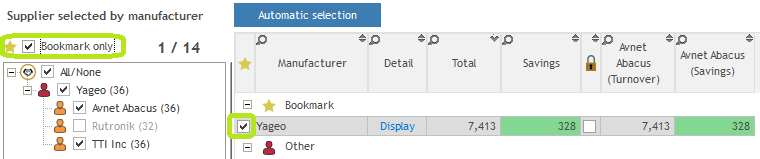
b. Manually adjust the supplier manufacturer per manufacturer thanks to the list on the left. You can therefore decide the suppliers you would like to assign for each manufacturer.
Note : you can use bookmarks to help you to work on few manufacturers and avoid scrolling the whole list every time.
Note : You can Lock a line when you decide that the assignment is ok for you. Therefore, you can’t change the assignment in the list on the left or in the details part per part (see below).
/!\ : This Lock function won’t work if you do “Automatic Selection” in the global view.
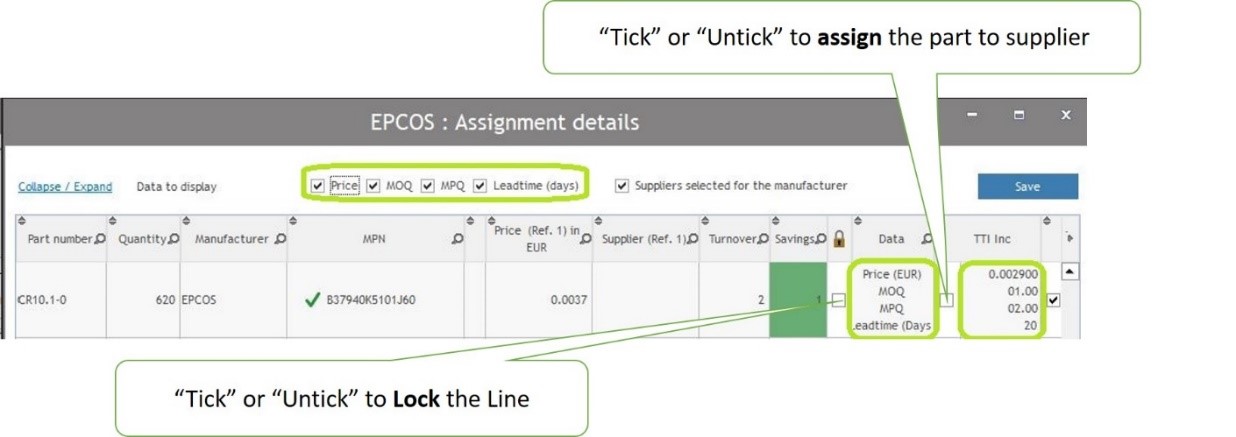
4. Choose the supplier part per part if needed for each manufacturer :
-
- Press “Display” on the Detail column : it will show you the item list for this manufacturer (in the picture below, it will show you the list of items for Yageo)
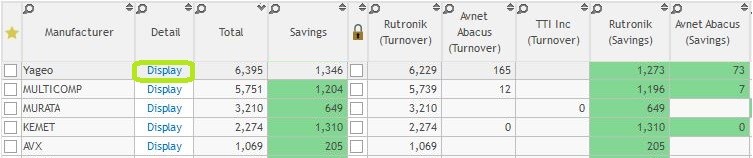
-
- Tick information on the top (Price, MOQ, MPQ, Leadtime) you want to browser. They will appear in columns on the right for each part.
- Select the supplier you want to assign for each part, by choosing between the different suppliers.
Note : You can Lock a line when you decide that the assignment is ok for you. Therefore, you can’t choose another supplier in this view or in the global view when you manually select a supplier in the list on the left.
/!\ : This Lock function won’t work if you do “Automatic Selection” in the global view.
5. When you finish to work with your scenario, you can add a memo if needed, then save and close (on the top).
6. If needed, you can create another scenario to test another purchasing strategy.
Note: Remember to Save each time you do a change :

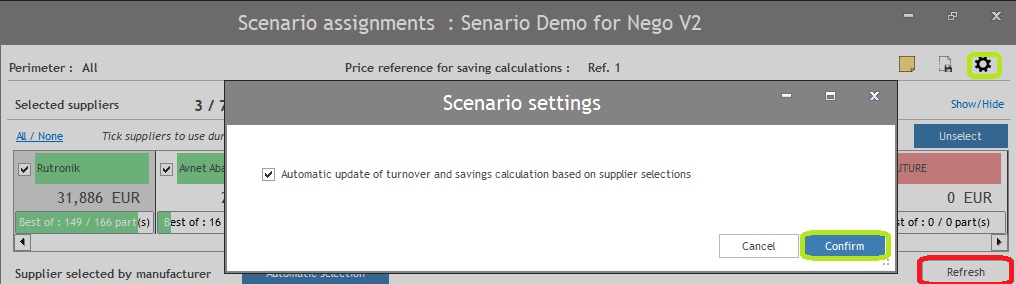
5. How to improve system performance if you have too many data?
If you have too many data, the system can be slow to refresh each time you do a change. Indeed, BM will have to recalculate all savings and turnover for all data.
To avoid this situation, the best is to deactivate the automatic calculation. Therefore, you can do few changes in once, then launch the calculation.
- Click the “Setting sign” on the top right.
- Untick “Automatic update of turnover and saving calculation based on supplier selections”.
- Next time you want to update the data, you can click “Refresh” on the top right of the table.
Step 5 – Negotiations : How to negotiate in Face to Face?
1. Process : How to prepare the F2F negotiation ?
-
Press “Best – Of Calculation” on the top left to let BM calculate final Best Of prices before negotiating.
- In the first table, select the supplier with whom you wish to negotiate.
-
Check that the selected quotation is the good one (in case you have multiple quotations from this supplier).
Note : Buymanager will automatically choose the Best Of price quotation to negotiate.
- If needed, manually change the selected quotation by right clicking on the quotation, then click on “Change negotiation quotation” and select the quotation you want to negotiate.

5. If needed, create a copy of the original quotation before to negotiate by clicking on “Save this quotation”. Therefore, you could compare the quotation before to negotiate to the one after the negotiation.
6. Finally, review statistics manufacturer per manufacturer by clicking on Display. A new table will appear below with different information. For more information about this table, see Step 5 – 7.
2. Process : How to manage the face to face negotiation ?
You have 2 possibilities to choose the perimeter you wish to negotiate :
-
All parts: you will negotiate all parts quoted by your supplier in once with him. To choose this option, click on “Negotiate all” in the first table, next to your supplier name.
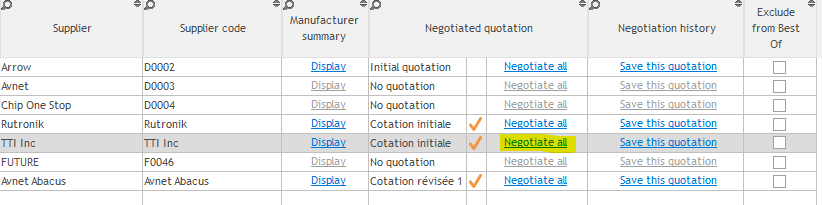
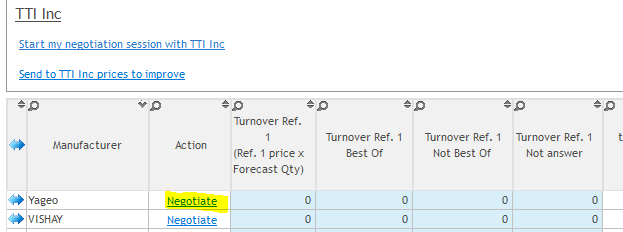
- Per manufacturer: you will negotiate only parts quoted by your supplier for one manufacturer, for example Yageo. And then you’ll negotiate for Murata, etc… To choose this option, click on “Negotiate” all” in the second table, next to the manufacturer name.
The choice is related to your negotiation strategy. You can decide to negotiate only for most important manufacturers (for example the 5 with the biggest turnover), so you will negotiate per manufacturer. Or you can decide to review parts with the biggest turnover, doesn’t matter the manufacturer. Therefore, you will negotiate for “all parts”.
After clicking on “negotiate” or “negotiate all”, the F2F negotiation window will be opened.
You will have one view per source, which will be classified from the biggest “forecasted turnover” (Ref.1 price x the forecasted quantity) to the lowest one (visible on the top right).
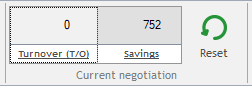
When you start to negotiate, check “current negotiation turnover” and “savings”. It should start with 0, then show you savings you did thanks to your negotiation. If needed, you can reset it to 0.
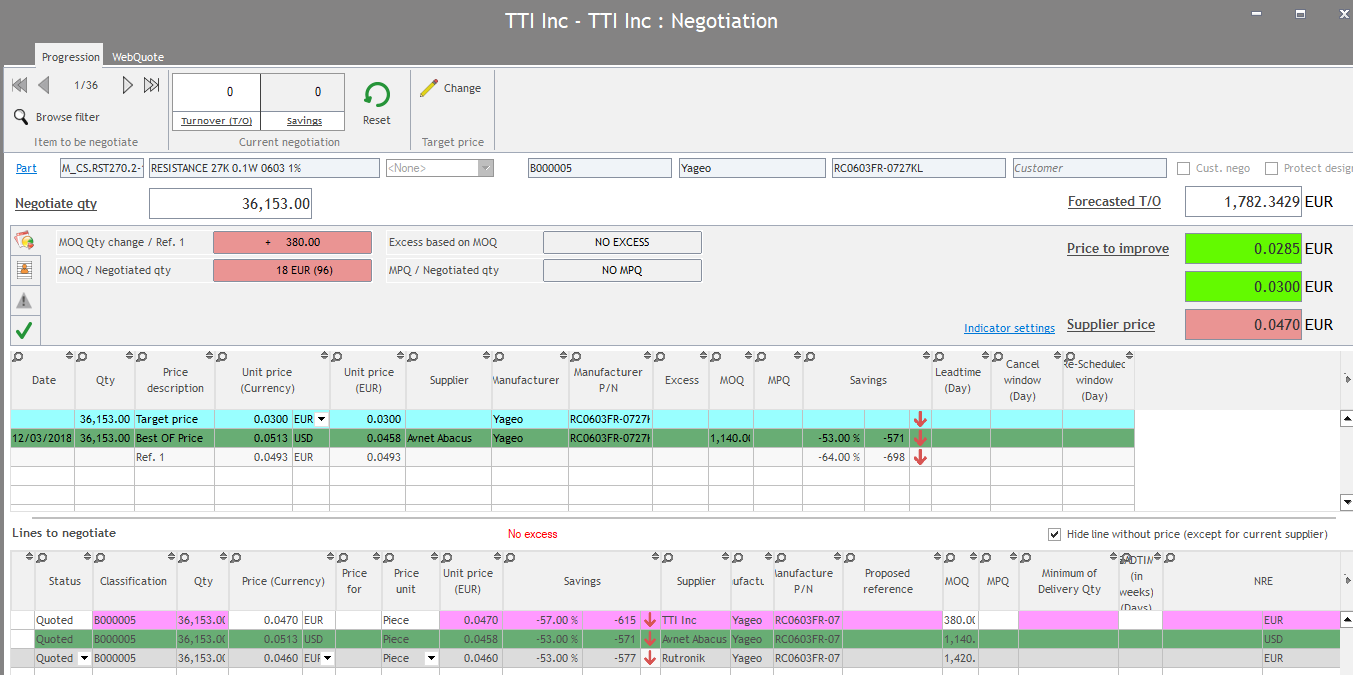
Process to negotiate a part :
-
Check all information that you have :
-
- Part information coming from your forecast dataset : part number, description, source, quantity, forecast turnover…
- Comparisons between your supplier price and your reference price 1 in terms of MOQ, MPQ, leadtime…
- Price to improve : Minimum between target price and Best of price
- Supplier price
- Other prices in the middle table : target price (in blue), reference prices, best of price (in green), other supplier prices…
-

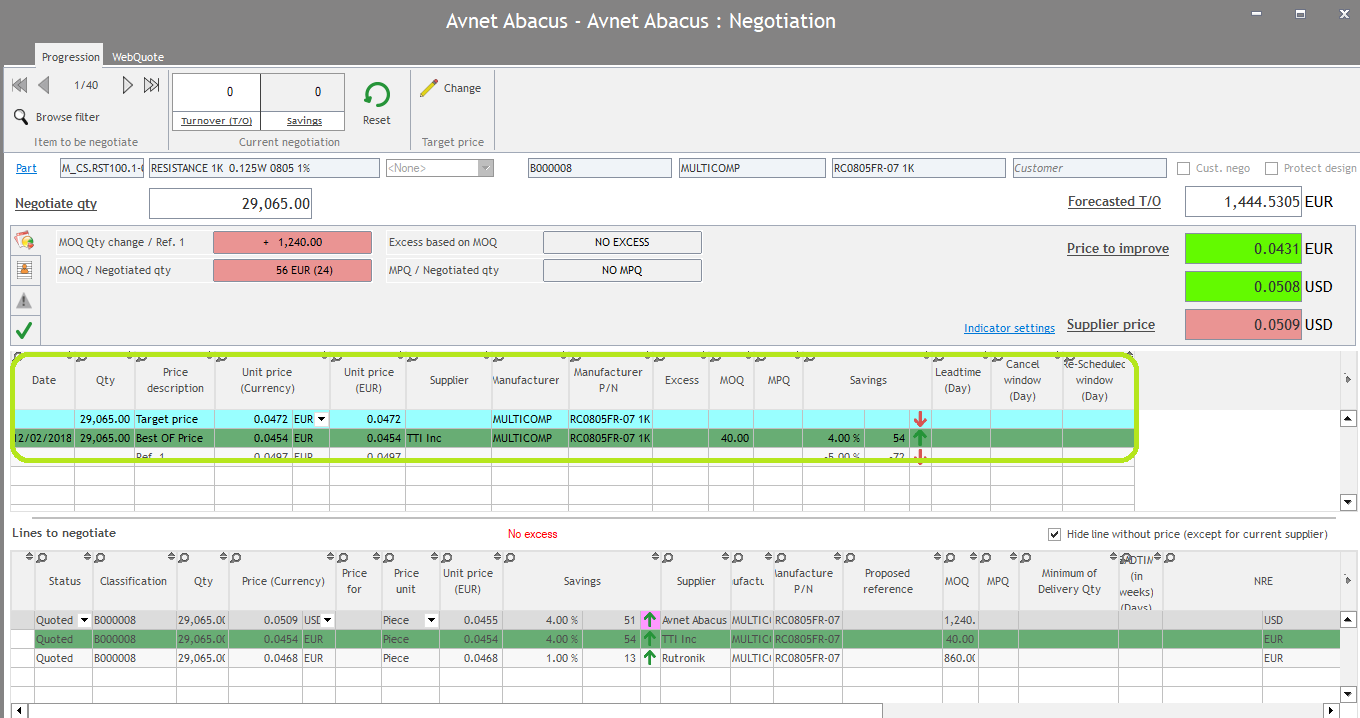
2. Review with your supplier his price information in the pink line in the bottom table (price, MOQ, leadtime…) and compare to your expectations.
3. Change information from your supplier in real time, while negotiating : in the pink line, you can change the price, currency, unit, MOQ, MPQ…
-
-
- The “Pink” line is supplier information.
- The “Green” line is the Best Of price.
- If you don’t have any pink line, it means either :
- Your supplier is the Best Of, so you’ll see only one green line.
- Your supplier didn’t quote this part even if you requested it.
-

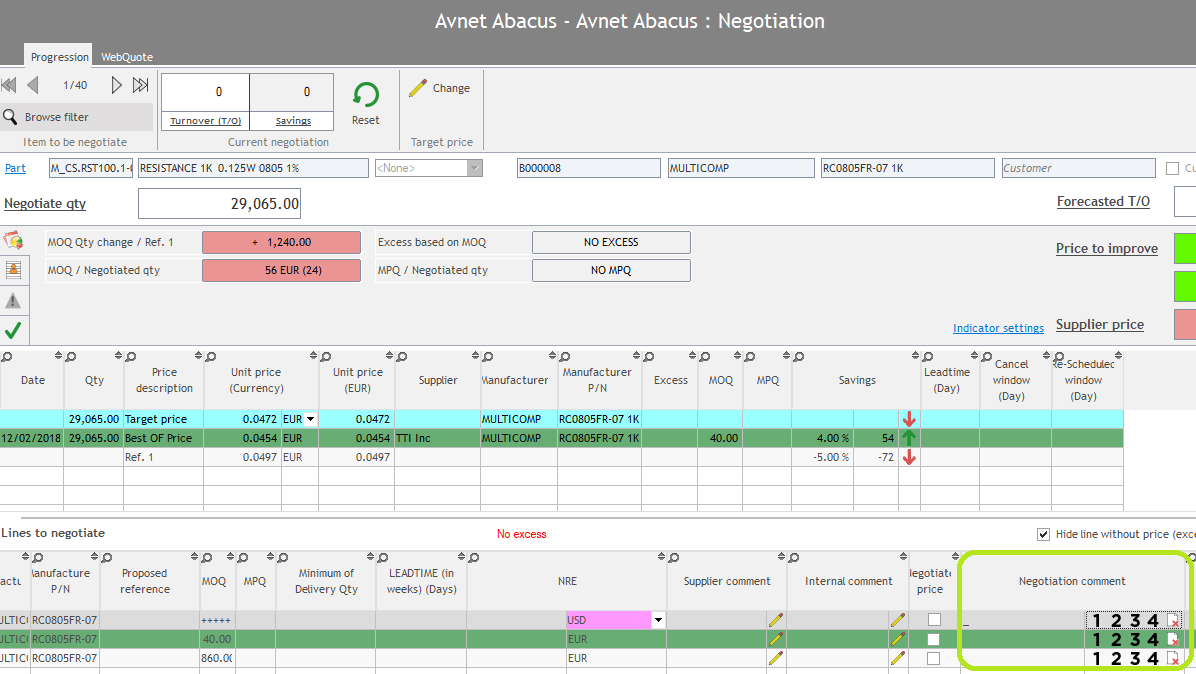
4. If needed, add comments about this negotiation :
-
-
- Internal comment : only for you and your team
- Supplier comment : a specific comment coming from your supplier
- Negotiation comment : related to the nego. You can define up to 4 automatic negotiation comments to avoid to always write the same thing. To see how to set up them, please go to Step 5 – 6.
-
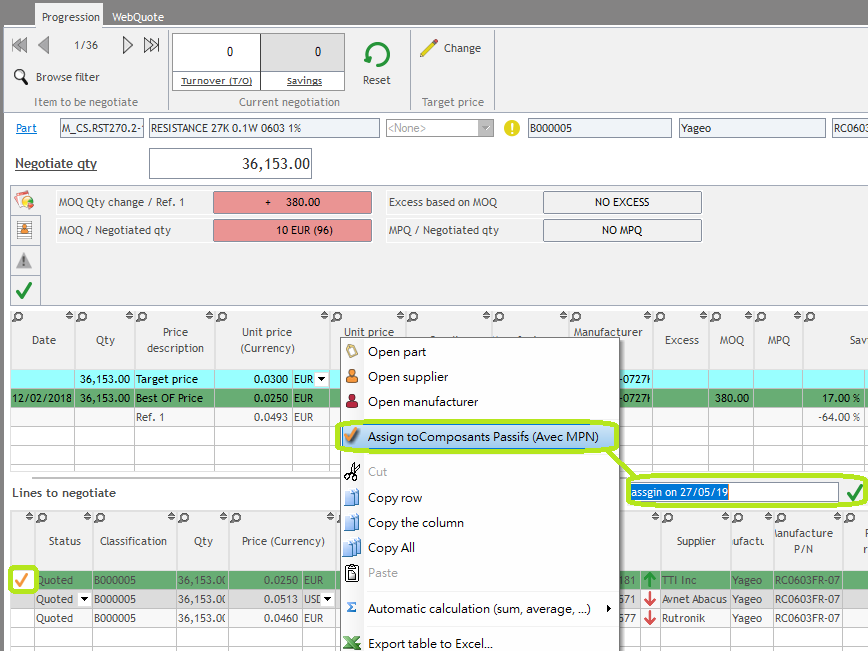
5. Assign the part to the supplier if you’re sure of your negotiation. Therefore, you couldn’t negotiate anymore this part with other suppliers.
-
-
- Right click on the supplier line in the bottom table (pink or green).
- Choose “Assign to (Negotiation description)“
- Fill the “Assign description” ex: assign on 27/05/19
- An orange check will appear next to the line to confirm your assignment and will be also visible in step 6.
-
6. After you’re done with this part negotiation, go to the next part to negotiate by clicking on the arrow on the top.
3. How to filter parts to see in the F2F negotiation ?
As you can have many parts to negotiate with your supplier, it can be useful to filter parts to focus on a selection.
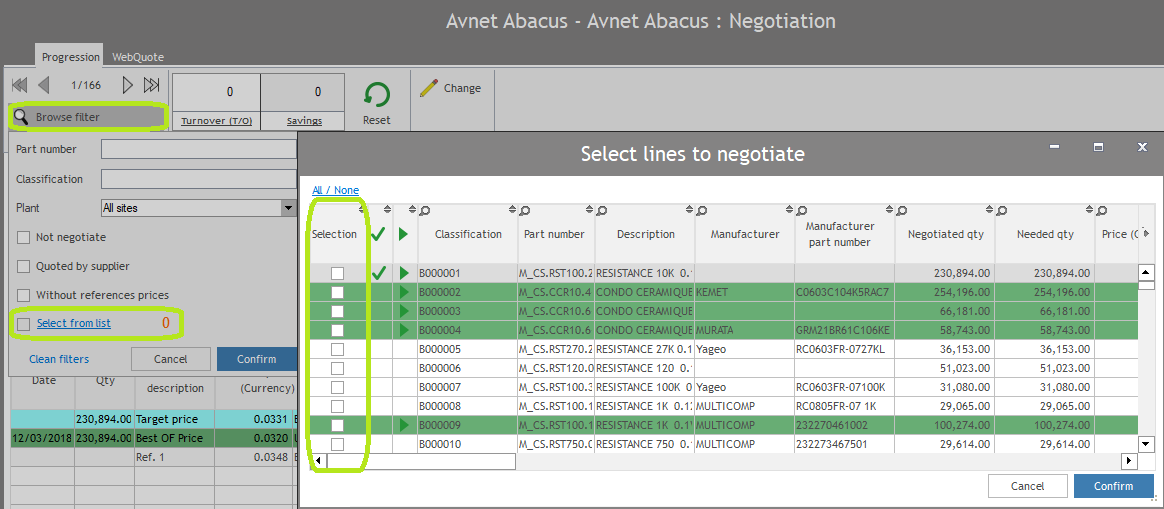
Therefore, click on “Browse filter” on the top left to select a filter.
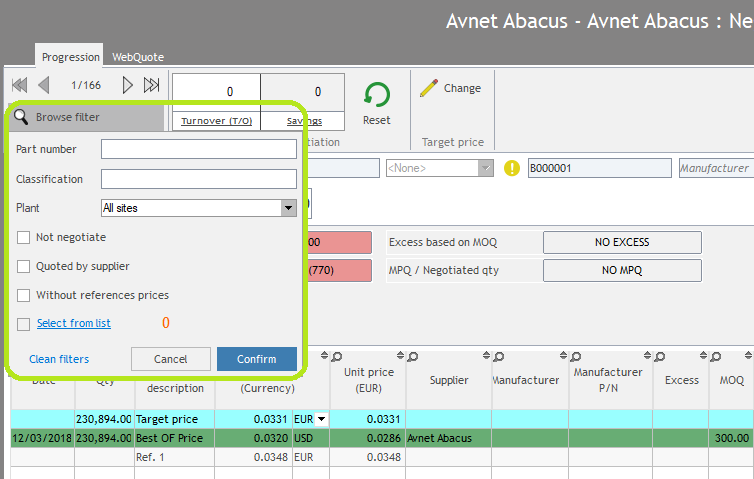
Different filters are available :
- Part number : enter your part number
- Classification : this is the number automatically created by Buymanager to sort parts by turnover (Ref1 price x forecast qty result). For example: B000001 is more expensive one, then B000002 is the second expansive one, etc.
- Plant : select the plant.
- Not negotiate
- Quoted by supplier
- Without references prices
- Select from list : Select some parts among the parts to negotiate with your supplier by ticking the box on the left. You can sort or filter the list based on different information such as the quantity, the price, the lines on which the supplier is Best Of (in green with a green arrow), etc. An orange check means that the line is already assigned, and a green check means that the line is already awarded : therefore, you can’t negotiate them.
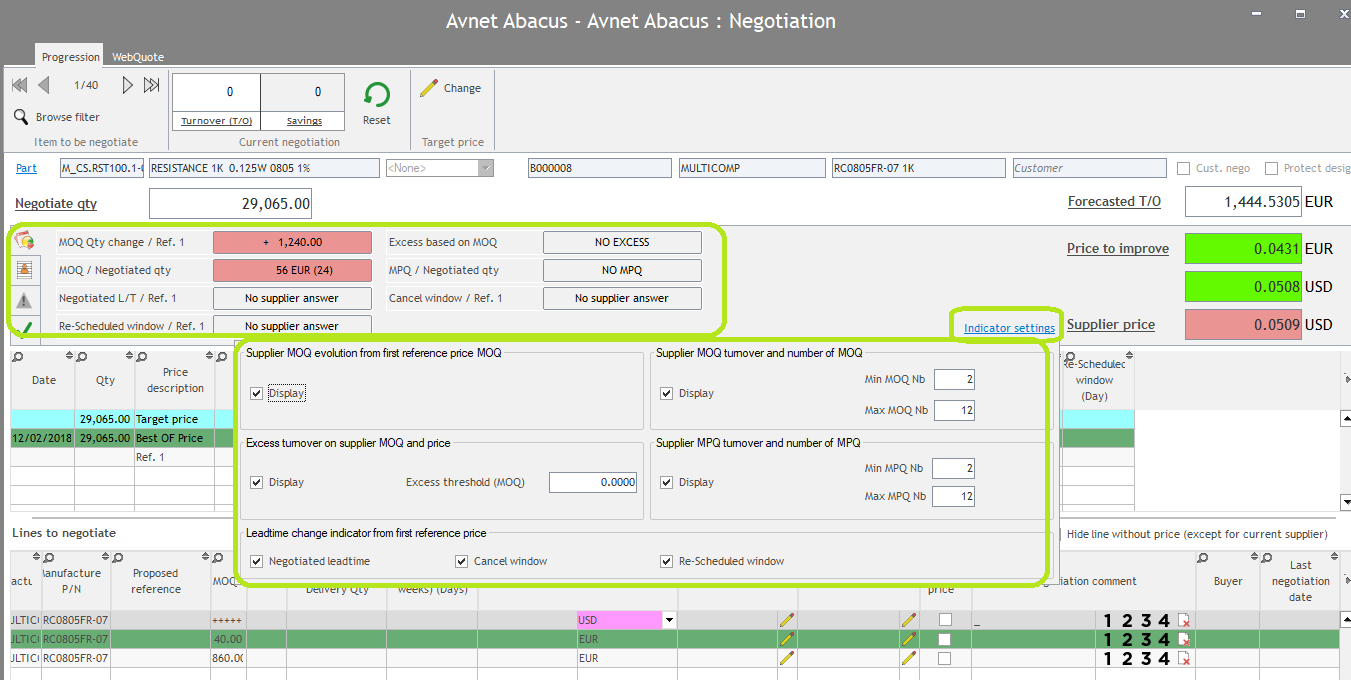
1. How to manage indicator settings in the F2F interface ?
In the middle of the F2F interface, you can check some indicators to compare your price characteristics coming from your supplier to the ones from your reference price 1.
These indicators can be set up to define for example his colour.
Process :
- Press “Indicator settings” on the right.
- Tick the ones you want to display such as MOQ, MPQ, leadtime, cancel window, re-scheduled window, etc.
- For some of them, define the interval to show them in green. For example, in the picture below, the “MOQ turnover and number of MOQ” will be displayed in green if the number of MOQ is between 2 and 12 (so maximum 1 per month). Otherwise, it will appear in red like in the picture (the number is 24 so it’s in red).
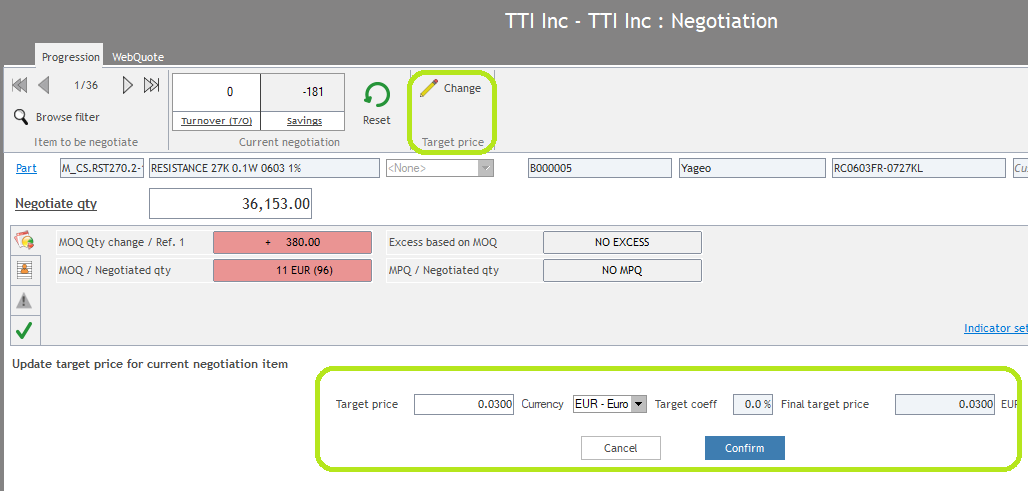
2. How to change the target price ?
While you are in the F2F negotiation, you may need to review your target price compare to the one you imported on the beginning. The reason could be, for example, that supplier prices are cheapest than your target price, so you wish to adjust it.
To process, click on “change” in the top header, then define your new target price and its currency.
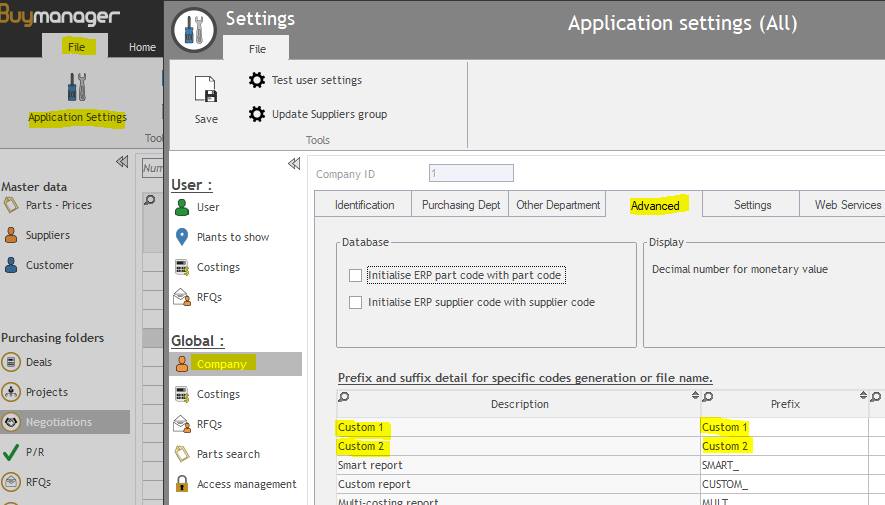
3. How to define automatic negation comments for F2F negotiation ?
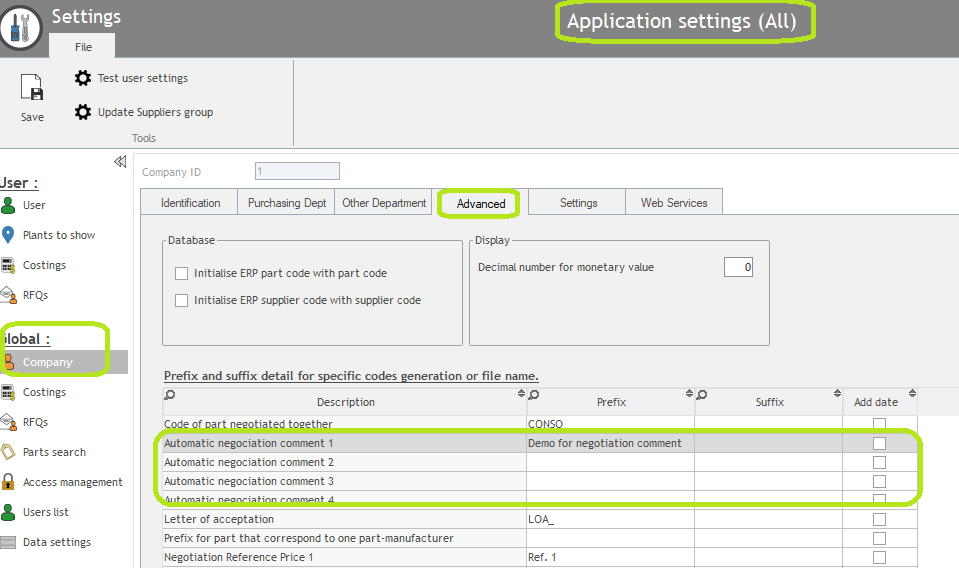
When you are in the F2F Negotiation, you can apply automatic negotiation comments by clicking on the numbers below.
To define these comments, you need to :
- Login as an Administrator.
- In Buymanager Home, go to File >> “Application settings” >> “Company” >> “Advanced” >> “Automatic negotiation comment 1~4”
- Fill in the comments in the “Automatic negotiation comment 1~4”
- Save and close, then refresh your negotiation to use these comments.
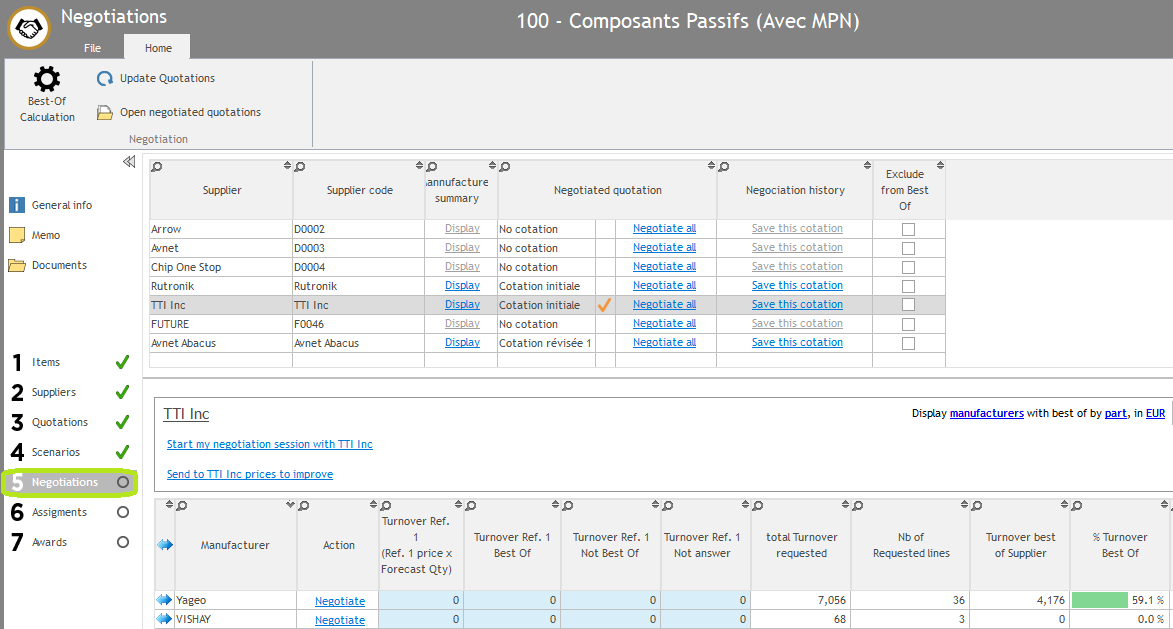
4. More information : statistics per manufacturer for each supplier
When you click on “display” in the Step 5 – Negotiation, some statistics appear per manufacturer for your supplier. This section explains the different statistics.
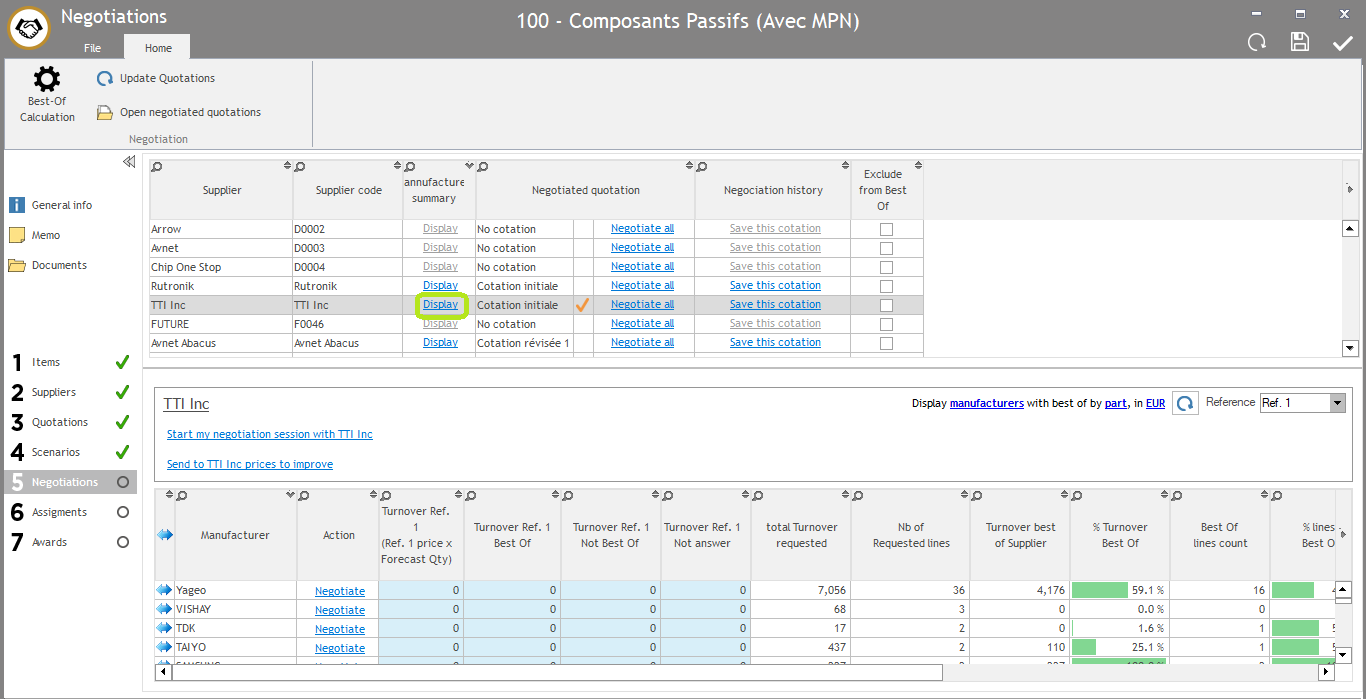
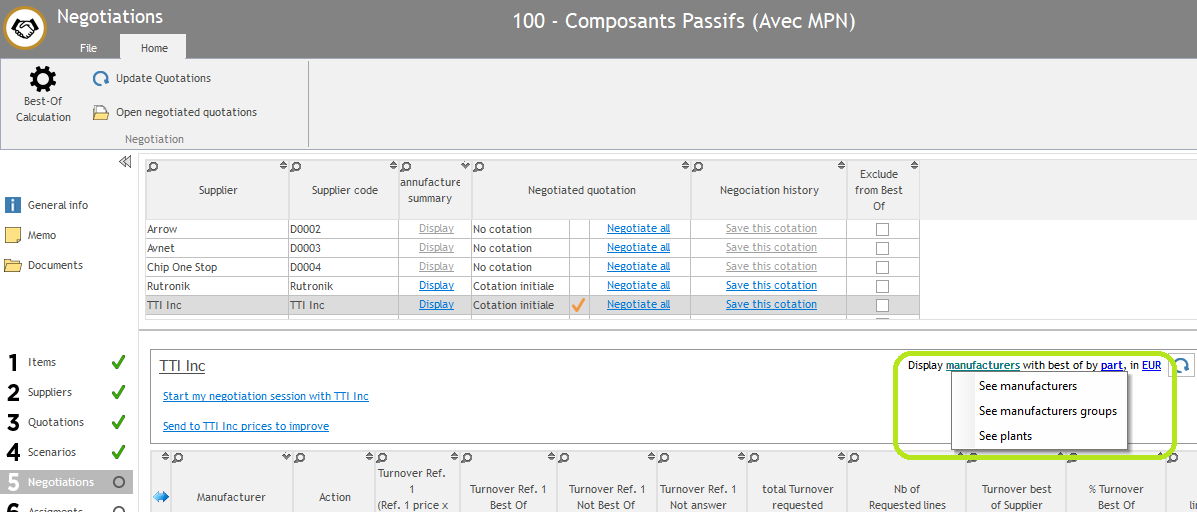
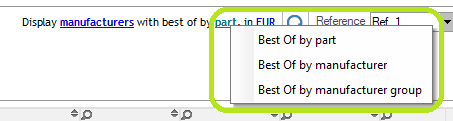
Set up the best view depending on your needs :
- Select on which base you would like to see statistics : by manufacturers, by manufacturers groups or by plants.
- Select on which element you will calculate the Best Of : by part, by manufacturer or by manufacturers groups.
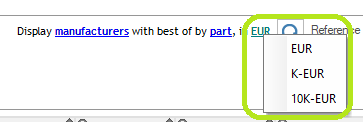
- Select the unit amount of your figures : figures displayed in Euro, K-EUR or 10K-EUR
- Select the reference price to use for the calculation : ref 1, 2 or 3.
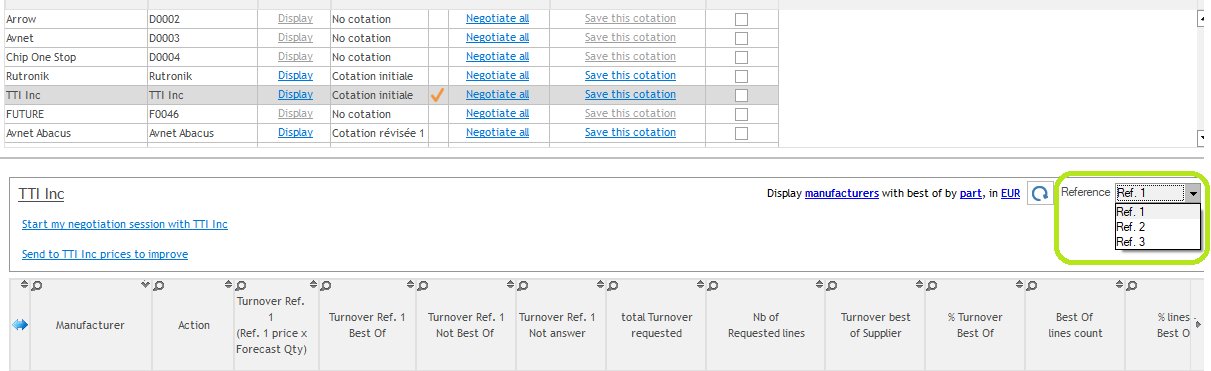
Once the settings are ok, review the different statistics (pictures & examples below are done with a setting “Manufacturers”, “best of by Part”, in “EUR” and for Ref 1).

- Manufacturer : name of your manufacturer (it could be the plant name if you chose to base the statistics on plants).
- Action : Start a Face to Face Negotiation by manufacturer for this supplier
-
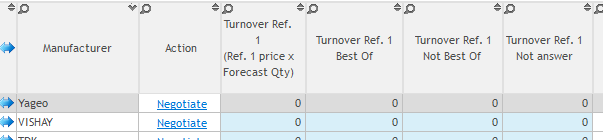
Columns in blue : figures based on your reference price 1 and your forecast quantity :
- Turnover Ref. 1 (Ref. 1 price x Forecast Qty) : The turnover price of 1 x forecast qty)
- Turnover Ref. 1 Best Of : The Ref. 1 best of price
- Turnover Ref. 1 Not Best Of : Not best of price of Ref.1 price
- Turnover Ref. 1 Not answer : Supplier not answer the price
- Total turnover requested: it’s the forecast quantity multiplied by the Best Of price for each Yageo component, doesn’t matter if the Best Of is the supplier you are currently watching or not.
- Nb of Requested lines: Number of lines on which you requested this supplier.
- Turnover Best Of Supplier: it’s the turnover on which the supplier is Best Of by manufacturer (forecast quantity x Best Of price from this supplier).
- % Turnover Best Of: Percentage of the Best Of supplier turnover compare to the total turnover (Turnover Best Of Supplier / Total turnover requested).
- Best Of lines count: Number of lines on which the supplier is Best Of.
- % lines Best Of: Percentage of the lines on which the supplier is Best Of compare to the total number of requested lines (Best Of lines count / Nb of Requested lines).
- Turnover not Best Of: Turnover on which the supplier is not Best Of (Total turnover requested – Turnover Best Of Supplier).
Note: The “Exclamation mark” displays the Best Of suppliers and their turnover on this “turnover not best of” for the current supplier.
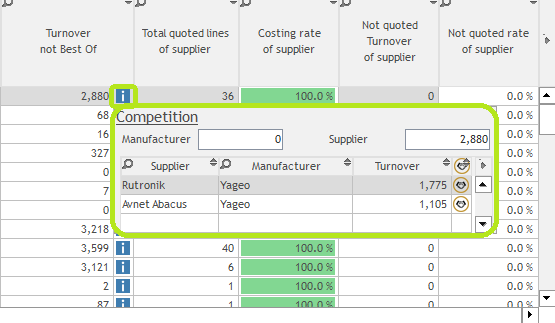
- Total quoted lines of supplier: number of lines that the supplier quoted.
- Costing rate of supplier : percentage of the number of quoted lines (Total quoted lines of supplier / Nb of Requested lines).
- Not quoted turnover of supplier : estimated turnover amount for lines not quoted by the supplier (best of price from other suppliers x forecast quantity).
- Not quoted rate of supplier : percentage of the number of non-quoted lines ((Nb of Requested lines – Total quoted lines of supplier) / Nb of Requested lines).
Step 6 – Assignments : How to assign a supplier to your parts ?
Goal : In this step, you can now assign suppliers to your parts, based on different criteria such as price, MOQ, leadtime, etc. There are 4 possibilities to assign :
- Based on Best Of suppliers
- Based on Reference price 1 supplier
- Based on a Scenario
- Manually assignment per part
Assignment can be done after all negotiations are finished, but also earlier in order to assign, for example, category C parts that you will not negotiate with your suppliers.
Note : Assignment and Award are separated in 2 different steps :
- Step 6 – Assignment : the purchaser assigns suppliers based on his criteria. The purchaser is usually the one who did the negotiation.
- Step 7 – Award : usually, the management team is the one who uses this step. The aim here is to confirm the assignment done by the purchaser. Once the choice is validated, reports can be sent to suppliers or to plants.

Before to assign suppliers, check the different information that you see in the table. It enables you to review price information (MOQ, leadtime, etc.) and to compare with your reference price 1.
All of them are related to :
- If the part is not assigned, information of the price for this part are the ones from the Best Of supplier.
- If the part is assigned, information of the price for this part are the ones from the assigned supplier.
Note : In the table, there is 1 line per part à if you decided to consolidate some parts in the beginning, you will not see the consolidated part in this view but the original part, which is the one you want to assign.
Once you checked information, you can now assign a supplier to your part. As mentioned, there are 4 possibilities to do it.
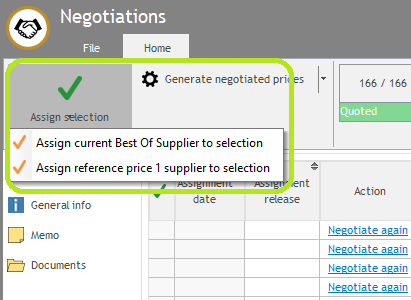
1. How to assign Best Of supplier?
Use this option to assign the Best Of supplier to the selected parts.
- Select the parts you wish to assign.
- Press “Assign selection” on the top left and select “Assign current Best Of Supplier to selection”.

-
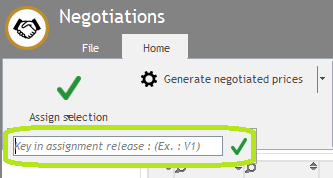
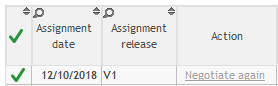
Key in the assignment release : this information will help you to recognize your assignment in future, for example “V1”, “V2”, etc.
- Once you confirmed, some information appears in your part assigned (they will also appear for the other assignment ways) :
- Orange tick to inform you that the part is now assigned
- Assignment date
- Assignment release
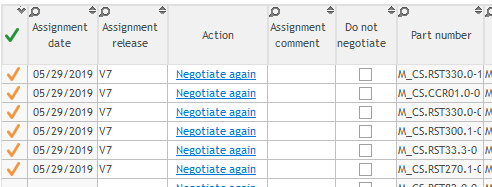
- If needed, add an assignment comment.
2. How to assign Reference price 1 supplier ?
Process is the same than the Best Of supplier assignment (see Step 6 – 1 above).
You just need to select the option “ Assign reference price 1 supplier to selection” when you click on “Assign selection” (step 2 of the process above).
All price information which are in the table will be replace by the ones coming from the new supplier assigned (in case the supplier is different from the Best Of supplier).
Note : supplier can’t be assigned to parts if :
- There is no supplier in the reference price 1.
- There is no quotation for this reference price 1 supplier (because for example you didn’t request this supplier in your current negotiation, so you can’t assign him to parts).
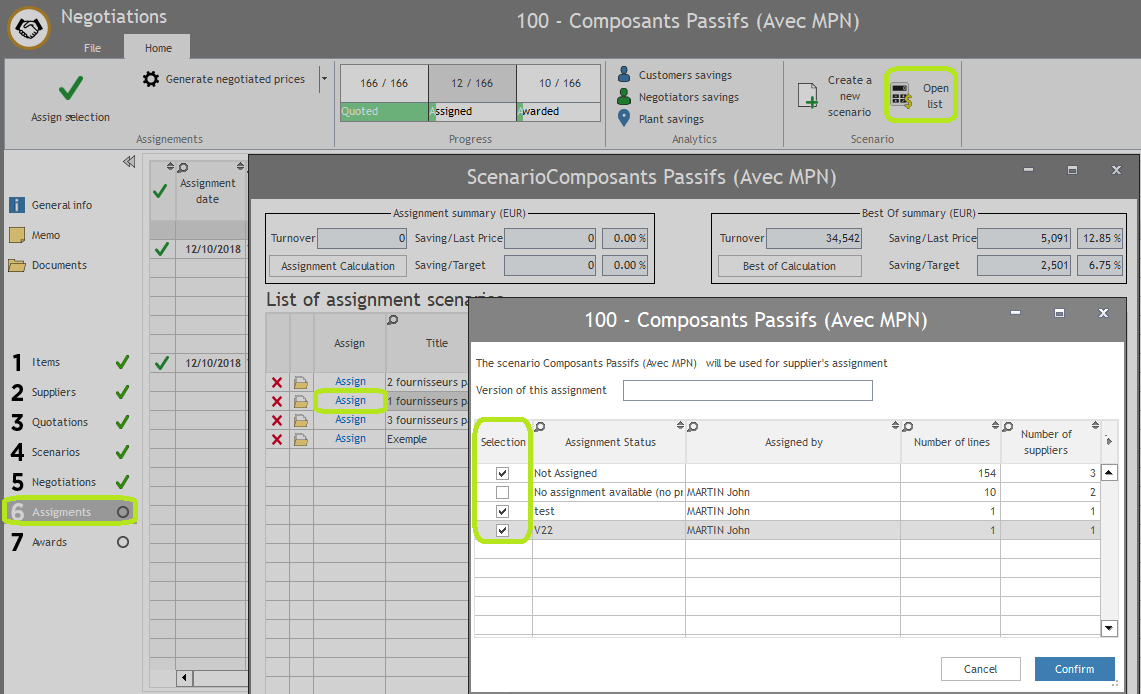
3. How to assign by scenario ?
If a scenario fits to your expectations, you can decide to assign suppliers to parts in the same way than in the scenario.
To assign a scenario :
- Click on “open list” on the top right.
-
Select the scenario you wish to assign
Note : If you need to create a new scenario, please click on “create a new scenario” next to “open list” button in the previous step. To review the process, please go to Step 4 – Scenario.
- Assign the scenario you wish by clicking on “Assign” on the left.
- Key in the assignment release in the field “version of the assignment”.
-
Select the lines you wish to assign :
- Not assigned : all the lines in the scenario which are not assigned yet.
- No assignment available : these lines have no price or are already awarded. Therefore, you can’t assign them.
- Assignment release (for example “V3”, “V7”) : these lines are already assigned, and their assignment release is for example V3. You need to decide if you wish to erase them with the new assignment coming from your scenario.
- Confirm
Within a scenario, you can also assign all lines of a manufacturer to one supplier.
To process :
- Open the scenario or create a new one.
- Select the manufacturer you wish to assign.
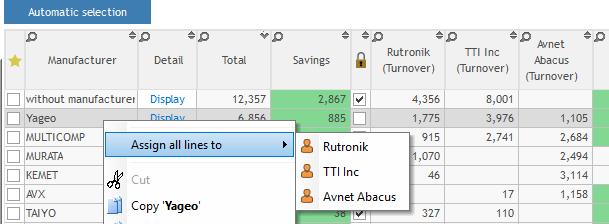
- Right click and select “assign all lines to”.
- Select the supplier you want to assign.
- Complete assignment information as above.
4. How to assign per part ?
Use this option to assign manually a specific part to a supplier who doesn’t fit criteria of Best Of or Ref price 1 or Scenario.
Process :
- Select the part you wish to be assigned.
- Press “Negotiate again” : it will re-open the Negotiation interface and show you price information coming from your Best Of supplier.
- Select the supplier you wish to assign in the bottom table.
- Right click and choose “Assign to (Negotiation description)”.
-
Key in the assignment release, for example “V3” or “assign on 27/05/19”.

An orange tick will appear next to the line. When you close the F2F interface, you will see all the new information coming from your assignment (such as in Best Of Assignment or 2. Ref 1 assignment).
5. How to manage assignment (change, delete…) ?
After an assignment is done, you still can need to change it.
If you wish to assign another supplier :
- Select the line
- Choose between these 2 possibilities :
- Assign another supplier by using one of the different possibilities explained above. For some possibilities (such as per scenario or per part), BM will ask you to confirm before doing the change.
- Right click and select “change final supplier”, then select supplier you want to assign.
If you wish to delete an assignment :
- Select the line
- Delete assignment release
- Press enter : it will delete assignment and therefore assignment date.
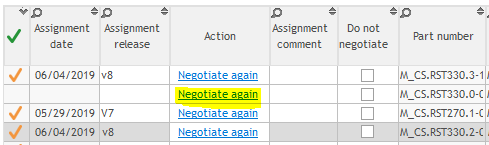
6. How to negotiate again a part with your supplier ?
If the prices you’ve got for this part do not fit to your expectations, you can renegotiate this part with your supplier.
In that case, it’s better to do it from the Step 6 – assignment because you can renegotiate part per part, doesn’t matter the supplier you choose. There’s no need to open the complete list of parts for this supplier, then filter on your part code, as you should do if you renegotiate from the Step 5 – Negotiation.
Process :
- Select the part you wish to renegotiate.
- Press “Negotiate again” : it will re-open the Negotiation interface and show you price information coming from your Best Of supplier or assigned supplier.

-
Change prices information for the supplier with whom you negotiate.
Note : In this view (from step 6 instead of Step 5), you can change price information for all suppliers, and not only the one you’re currently negotiating.

- If needed, assign the part with the new price to the supplier (see Step 6 – 4.)
Note : You can renegotiate your part even if an assignment is already done.
7. How to generate negotiated prices in BM ?
This function enables you to create the new prices you just negotiate in BM. They will appear as NEG prices.
Recommendation :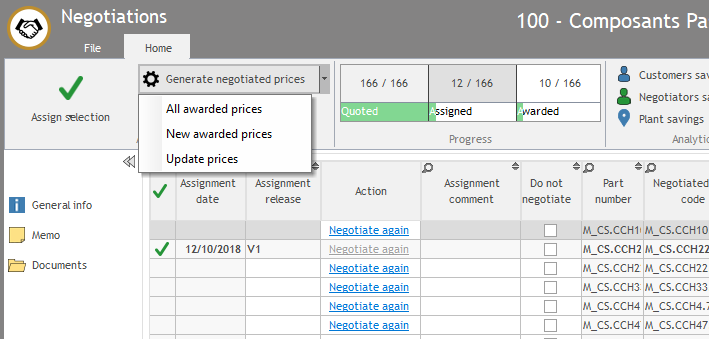
- Use this function after prices are awarded (step 7).
- We strongly recommend you not to use this function without assist and/or without your management confirmation.
Note : If you have an ERP synchro, this function may cause duplicated prices once you’ll upload the new prices in your ERP.
Step 7 – Award : How to award your suppliers and send reports ?
Goal : In this step, the decision maker can approve assignment done by purchasers in step 6. Once approvals are done, reports can be sent to plant or to suppliers.
1. Process : How to award suppliers ?
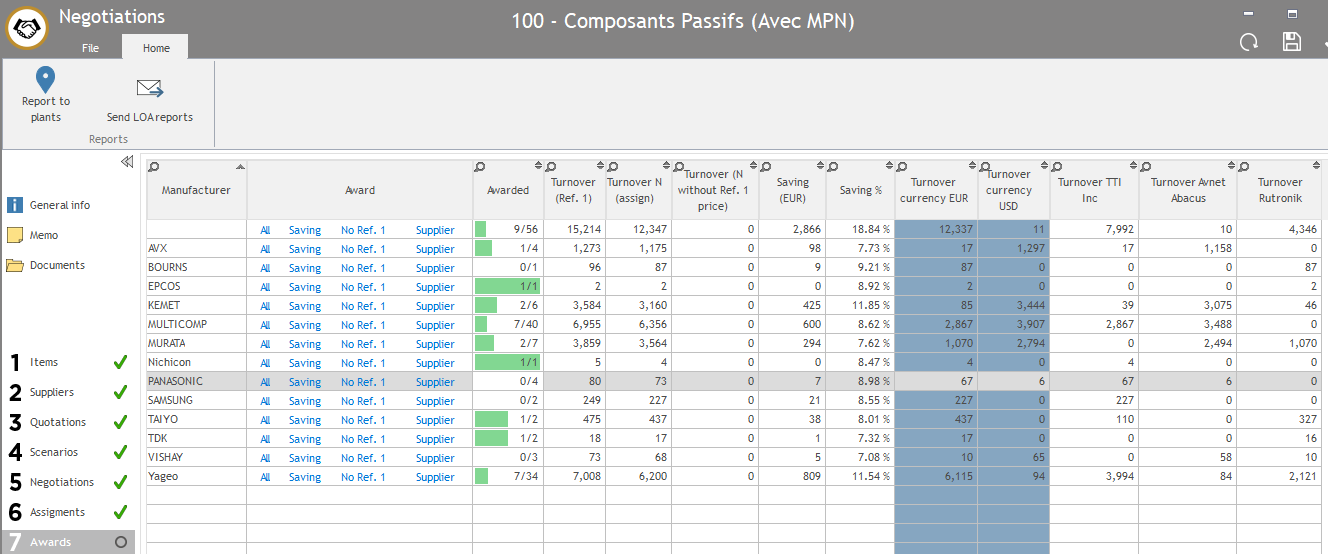
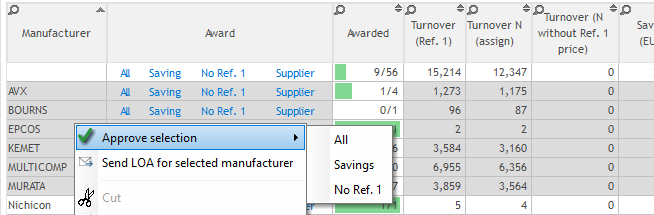
- Check information for each manufacturer in different columns : already awarded suppliers, global turnover and savings, turnover per currency, turnover per supplier, etc.
-
Award supplier by clicking on one of the 4 possibilities :
- All: All the lines are approved according to Step 6 choices.
- Saving: Only lines with savings are approved.
- No Ref 1: Only lines with Reference price 1 supplier assigned are approved.
-
Supplier: Approve lines according to suppliers. For example, if 2 suppliers are assigned for this manufacturer, you can decide to award only lines assigned to Rutronik, and not the ones to TTI.

- Note : You can award a selection of manufacturers by selecting your manufacturer lines, then right click, and choose your award possibility (not possible for “Award per supplier”).
Note : Approved lines will appear with a green tick in the step 6 – Assignment. Therefore, if some lines are not approved by the decision maker, the tick will remain orange. You can then sort your lines by ticks, and focus on the orange ones to improve your assignment and answer to your decision maker expectations.
2. Process : How to send final reports ?
Once suppliers are awarded, you need to export all prices information for each part in order to send them to suppliers and to plant.
Note : These reports can be customized to reach your expectations. Please see with an administrator to process to this customization.
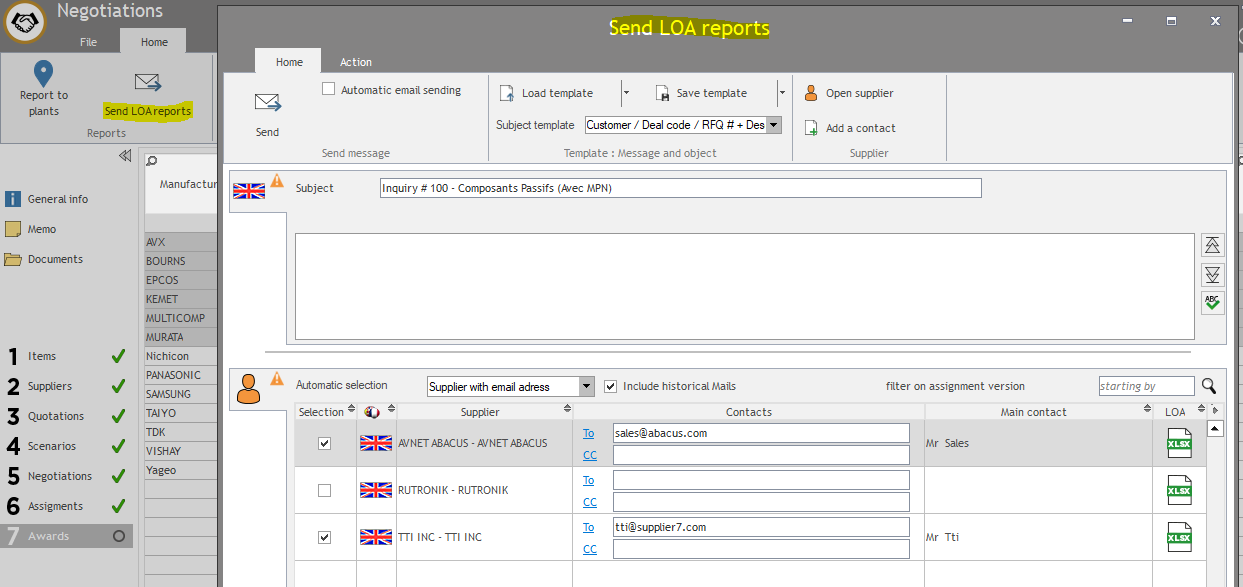
How to send LOA (list of agreement) ?
- LOA is the report that you will send to suppliers. The supplier will usually receive an Excel file with the list of parts on which he’s awarded, and all prices information linked (MOQ, MPQ, leadtime…). Sometimes, suppliers need to sign this LOA to confirm prices for the year to come.
- On the top left, click on “send LOA reports”.
- A window will open such as the one to send RFQ : write you message, select the suppliers to whom you want to send LOA, check the LOA by clicking on Excel icon, etc.
How to send reports to plant ?
- You can define 2 custom reports. These reports are internal, and will usually be used to send the list of new prices and awarded suppliers to :
- Your plants and all purchasers, in order to enable them to use these prices while they are loaded into ERP.
- Your ERP in order to load prices into the system.
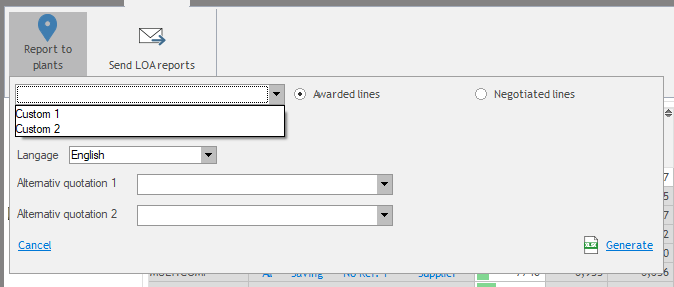
- On the top left, click on “reports to plant”.
- Select the report you wish to generate : custom 1 or custom 2.
Note : You can change the titles “custom 1” and “custom 2” if needed. To proceed, connect as an Administrator to BM, then go to “File” >> “Application settings” >> “Company” >> “Advanced” >> and change the Prefix column for Custom 1 and Custom 2.
- Select “awarded lines” to export all the awarded lines. If needed, you can export all the negotiated lines.
- Select the language.
- Click on Generate.
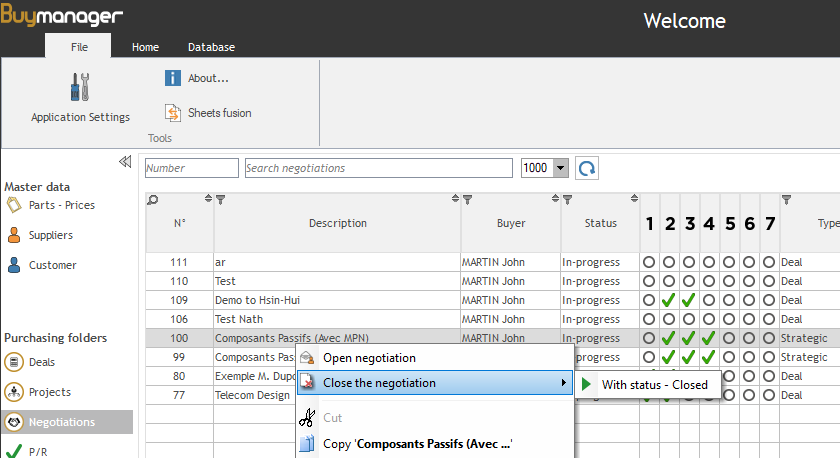
Step 8 – How to close your Negotiation ?
Your negotiation is now over.
To close it, save and close your negotiation.
Then, in Negotiation Home, in the list of negotiations :
- Select your negotiation (if you can’t see it, please refresh the search).
- Right click on your negotiation.
- Select “close the negotiation”.
- If needed, choose the status.