What is this feature?
This guide explains how to upload Bill of Materials (BOM) files into Buymanager and create templates to streamline future uploads. The BOM template feature allows you to map columns from your Excel or text files to the appropriate fields in Buymanager.
Why do you need it?
- Efficiently import customer BOMs with different structures
- Save time by creating reusable templates for regular customers
- Ensure consistent data mapping across multiple imports
- Handle various BOM formats, including multi-level BOMs and multiple manufacturer references
Prerequisites and audience
- All Buymanager users who need to import BOMs can create a model. However, we recommend working as a team together to agree on a maximum of 5 models, to avoid any confusion and stay consistent.
- No special administrative rights required
- Particularly useful for users who regularly receive BOMs from different customers
How it works
How to upload your BOM (Excel or text file)
1. Open your Deal >> Products >> Upload
2. Click the magnifier sign >> Select the file you want to upload
3. Press Next to configure your BOM template
How to create a BOM template
1. After uploading the BOM file >> click Create
2. Specify the name of the BOM template
3. - Tick "see all fields" to see all available column/field names for import.
- If needed, you can click on "preview imported file" to view your file and see the column you may need to import.
- Tick the check on the "to upload" column on all fields you wish to be able to import (Description, Quantity, Manufacturer, MPN... )
4. Click Confirm.
5. Click upload to use the new template.
Note: New templates are created as "customer dedicated templates " visible by the user who created it. To make the template visible to all users, click on "Change upload template to common."
If you want the template to be the default template (the template automatically first selected when uploading a new BOM), on the Template settings, check the "main template" box.
How to use the Upload wizard
After completing the above steps, the "Upload wizard" will open:
1. Choose the column header:
- If you have multiple tabs on your file, select the tab you want to import
- Click on the line with the headers to select it (the arrow will be in front of it)
Note: If you do not have any headers on your file, UNTICK "Column title in first line". Buymanager will then map your file by column (Column A, B, C, etc) instead of via the headers.
3. Click Next
4. Map file columns to Buymanager fields
3. Press "+" to save "Keywords" (this allows you to skip mapping for future uploads with the same structure)
4. Click "Next" to finish
EXAMPLES :
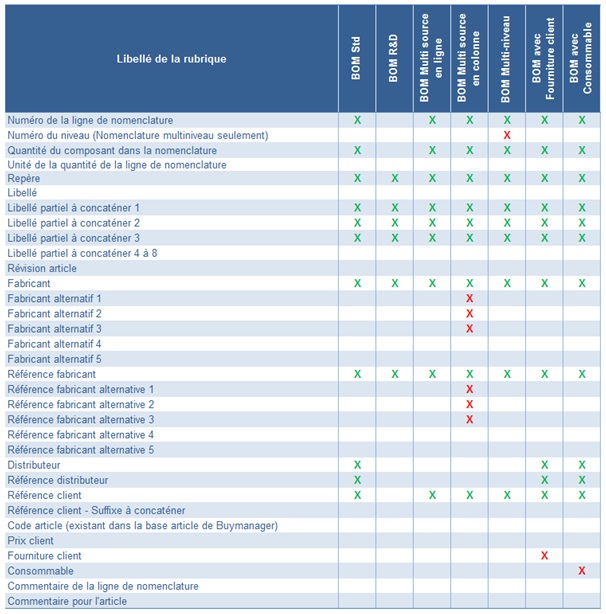
The system can handle various BOM formats:
1. Simple BOMs: All BOM lines match the part lines > the model will likely include Description, Quantity, Manufacturer, MPN, Customer References, Designator (Find Number)
2. Combined descriptions: Partial descriptions across multiple columns can be combined
> Here, the "Supplementary Description 1", 2, 3, ... to 8 will be checked on the model.
All data mapped on this column will be aggregated into the one "description" column on the costing later.
3. Designator-based BOMs:
> Each line on the BOM will correspond to a quantity of 1 (one designator). Buymanager will automatically combine the lines with the same designator after the BOM is generated.
4. Multi-source parts: Same parts with multiple manufacturer options
> Buymanager will automatically combine records with identical descriptions during the import process and consider the multiple manufacturers as alternatives.
5. Source lines: Part sources located on lines following the BOM line
> A line with an empty description will automatically be considered as a source/ alternative for the first above line with a description.
6. Multi-column sources: Part sources located in different columns
> the sources are separate in multiple columns (e.g., Column A = Manufacturer 1, Column B = MPN 1, Column C = Manufacturer 2, Column D = MPN 2.... )
> Here, the field "manufacturer 2, "manufacturer reference 2" will have to be selected in the Import Model.
7. ERP BOMs: BOMs with ERP codes that already exist in Buymanager
> Here, the field "ERP Code part (existing in Buymanager) will have to be selected on the import model. Buymanager will automatically recognize the Articles from those codes.
9. Split BOMs: BOMs and sources separated in different files or Excel sheets
> Here, you will need to upload and generate the BOM without sources first (file/tab containing other information and the obligatory customer reference)
>Ten, create another BOM using the same part number, and upload the remaining information (i.e, sources with customer reference).
> Then use the "Auto search" via the "customer reference (same customer) to find the original parts.
By creating appropriate templates for each scenario, you can efficiently import any BOM format into Buymanager.